
Sink Drain Repair: A Practical DIY Guide for Homeowners

A straightforward sink drain repair often costs about $250 to $1,250, while a simple drain cleaning commonly runs $100 to $350; more serious damage can cost much more. Most sink problems fall into three buckets, a clog, a leak at the trap, or a damaged component, and this guide walks through all three before showing when professional repair is the smarter call.
You're standing at the kitchen sink with a basin full of cloudy water, a damp cabinet floor, or a drain that has been getting slower all week. The natural reaction is to grab a plunger. Sometimes that's exactly right. Other times, it pushes you toward the wrong repair and turns a manageable leak or branch-line obstruction into a mess.
The useful question isn't, “How do I unclog this sink?” It's, “Where is the failure, and what can I safely do next?” That triage-first approach helps you avoid wasting money on chemical cleaners, replacement parts, or repeated DIY attempts when the trouble is farther down the drainage system.
Why Sink Drain Repair Starts With a Diagnosis, Not a Plunger
A sink drain repair usually begins by sorting the symptom into one of three buckets.
A clog inside the line restricts flow but may leave the plumbing dry. The blockage might sit in the stopper opening, P-trap, or short branch line. A leak at the trap or a connection allows water to escape beneath the sink, even when the basin drains normally. A damaged component, such as a pop-up assembly, tailpiece, slip washer, or cracked trap, needs part replacement rather than more pressure on the blockage.
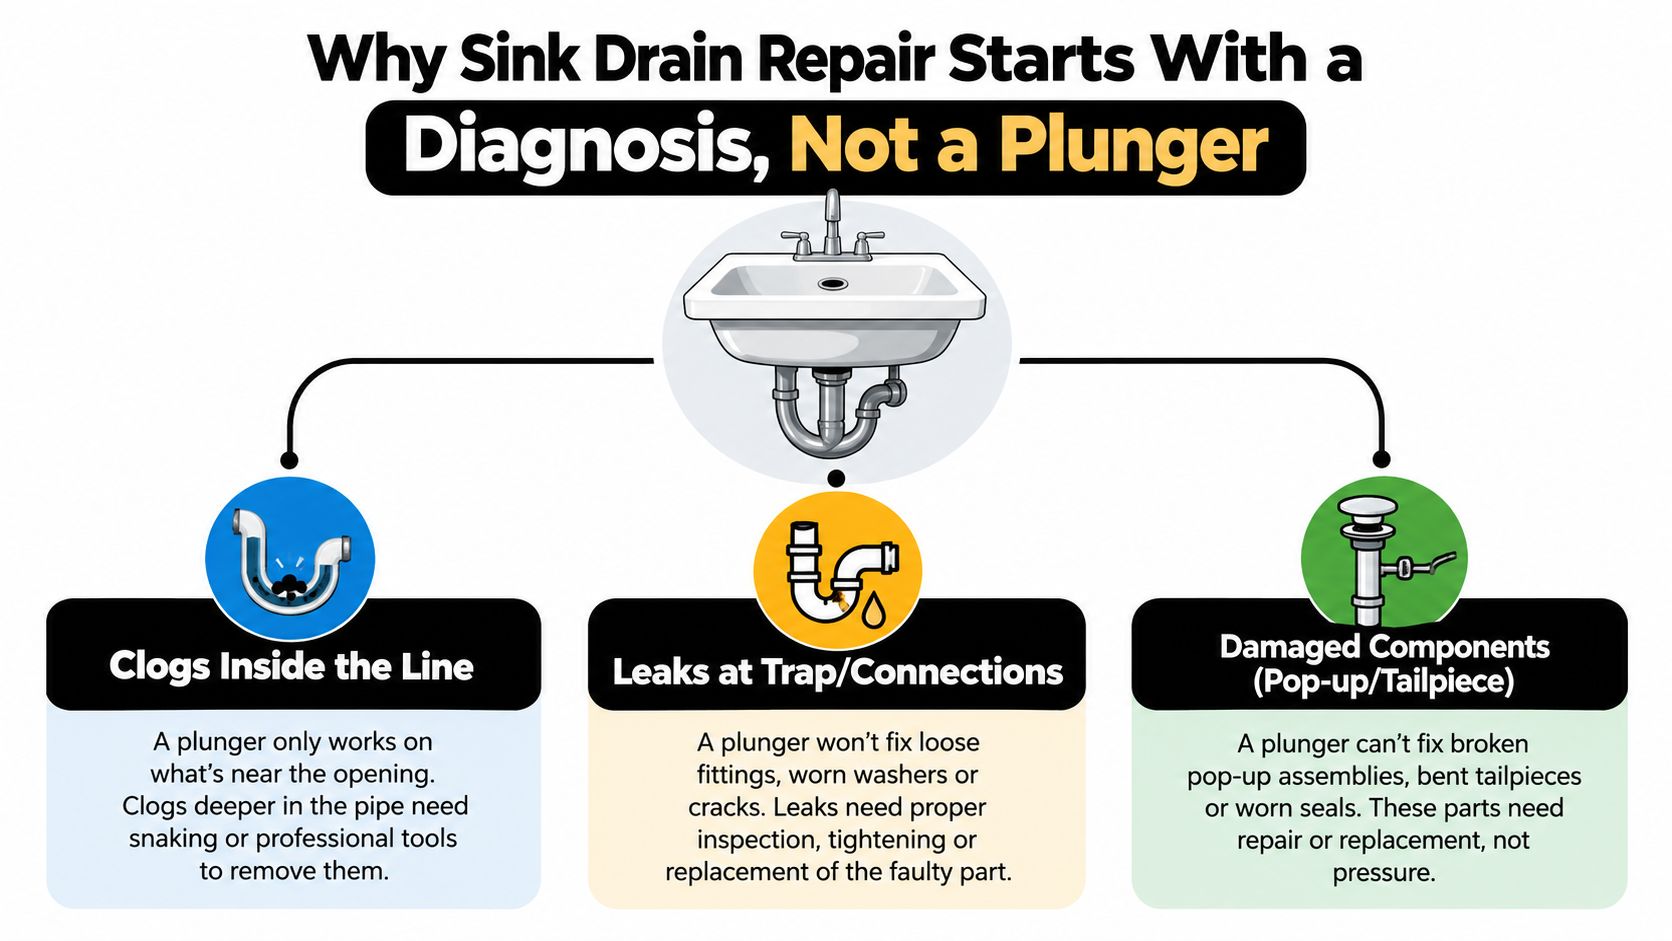
The distinction matters because a plunger only addresses resistance in the drain. It won't repair a split pipe, reseal a failed washer, or correct a venting problem. Force can also loosen an already weak connection, especially beneath an older sink, while chemical cleaners may sit above the obstruction and expose you to caustic liquid when you later open the trap. Guidance on DIY versus professional drain clearing recommends mechanical methods first and warns against forcing tools or relying on harsh chemicals as a default solution.
What belongs in a homeowner's toolbox
A homeowner can generally inspect the stopper, remove visible debris, try a properly sealed plunger, and clean an accessible P-trap. A hand auger is also reasonable when the blockage is reachable and the drain assembly is in sound condition. Work slowly, protect the cabinet, and stop if a fitting feels brittle or begins to twist with the pipe.
The job changes when you find corroded galvanized piping, a cracked drain body, a damaged shutoff valve, or water that appears to come from inside the wall. Ongoing backups involving toilets, tubs, or more than one sink also suggest a branch or main drainage problem rather than a fixture-level clog.
Practical rule: A plunger is a tool for a suspected clog, not a diagnosis for every sink problem.
The P-trap remains central to modern sink troubleshooting. Historical plumbing summaries describe how sinks evolved from manually emptied basins into connected indoor fixtures, with the curved P-trap becoming a standard way to hold water and block sewer gases. That basic trap-and-pipe arrangement still guides today's checks for odors, leaks, and slow drainage, as explained in this history of drain repair and P-trap design.
Reading the Symptoms Before You Reach for a Tool
Start with the sink as it is, not with the tool you hope will solve it. Suppose the basin now takes several minutes to empty. First, watch the water level. Does it sit still, drain slowly, or rise when another fixture runs? A slow fall usually points to restricted flow near the fixture. Water that rises in response to activity elsewhere deserves more caution.
Listen next. A soft gurgle from one sink can indicate air moving around a partial obstruction. Gurgling from several fixtures is a different situation because the obstruction or venting issue may be farther along the drainage route. The same applies to odor. A stale smell from a dirty stopper is not the same as persistent sewer odor that returns after the trap has been cleaned.
Open the cabinet with a flashlight and look before loosening anything. A chalky ring around a slip nut, dark staining on the cabinet floor, or a bead of water on the bottom of the trap indicates a leak, even if the sink still drains. Place a dry paper towel beneath each connection, run a small amount of water, and check which point becomes wet.
Let the location narrow the repair
A stopper that lifts poorly or comes out with hair, soap, food residue, or sludge may be the entire problem. If the stopper is clean but the basin remains slow, the P-trap becomes the next likely location. A clear trap with resistance beyond the wall connection points toward the branch line.
The number of affected fixtures is one of the strongest clues. A single slow sink is often local. Multiple slow drains, gurgling, sewer odors, or backups into tubs and showers point toward a main drain or sewer issue, a distinction emphasized in this plumbing troubleshooting FAQ.
Before choosing a method, ask yourself:
What changed recently? Renovation dust, a newly installed disposal, or a moved drain connection can introduce a different failure.
What goes down this sink? Kitchen grease and food residue behave differently from bathroom hair and soap buildup.
How often does it happen? A first-time slowdown may respond to clearing. A clog that keeps returning needs diagnosis, not another blind attempt.
Does another fixture react? Water movement elsewhere can reveal a shared branch or main-line restriction.
That short inspection prevents a common mistake: treating every slow sink as a nearby clog when the symptom pattern already indicates a larger problem.
DIY Methods That Work on Common Sink Drain Problems
Treat sink drain repair as a triage decision before choosing a tool. Start with the least invasive method suited to the symptom, then escalate only when the obstruction or damage warrants it. This protects the plumbing and prevents spending money on a repair that does not address the fault.
A sealed plunger is the first practical test for a localized clog. Use a flat-bottomed cup plunger on a flat sink opening. If the opening is narrow or the overflow makes sealing difficult, use a suitable flange-style plunger and block the overflow with a damp cloth. Add enough water to cover the cup, press it firmly over the drain, and pump while keeping the seal intact. On a double-bowl kitchen sink, plug the second opening first so pressure does not escape.
Plunging clears many minor, localized blockages. A hand auger is the next option for hair and soap buildup beyond the stopper. Use controlled, steady pressure. If repeated plunging produces no change, pumping harder will not improve the diagnosis. Stop and reassess the obstruction's location.
Move to a hand auger carefully
When the blockage sits beyond the stopper, a hand auger can reach it. A stainless steel hand-crank model around 25 feet long is a practical benchmark for reachable sink clogs, as described in this hand-auger cleaning guidance. Feed the cable gradually. When you meet resistance, rotate the handle clockwise in small increments instead of forcing the cable forward.
The aim is to catch, break, or work through the obstruction without damaging the pipe. Pull the cable back periodically to remove debris, then test the drain with a controlled flow of water. If the cable kinks, binds sharply, or seems to have entered a fragile fitting, stop. A stuck auger can turn a simple clog into a damaged connection.
Clean the P-trap instead of guessing
Place a bucket and towels beneath the curved trap. Loosen the slip nuts counterclockwise by hand, supporting the pipe so the wall connection does not twist. Let the water drain into the bucket, inspect the trap for buildup, and clean its interior. Check the tailpiece and the horizontal pipe leading into the wall before putting everything back together.
Reassemble the pieces by hand, keeping the washers aligned and the threads straight. Do not force plastic fittings or overtighten them. Misaligned parts and excessive pressure can crack a joint and create a new leak.
For kitchen plumbing work beyond a simple tool check, 1st Choice Home Repairs kitchen services are one option to consider. A professional visit should still begin by identifying whether the fault is at the stopper, trap, branch line, or a damaged connection.
Run water into the basin and inspect every joint as it drains. Then fill the sink partially, let it stand, and check beneath the cabinet again. A dry cabinet during a quick flow test does not always confirm that the seal holds under standing water.
What Sink Drain Repair Typically Costs and When DIY Pays Off
You pull the cabinet open and find a slow drain, a damp fitting, or both. The cheapest fix depends on locating the failure first. A plunger or hand auger may cost little, while replacing a trap, tailpiece, or drain assembly adds parts and working time. Chemical cleaner can seem inexpensive, yet it may leave the obstruction behind and make later disassembly more hazardous.
Use this sink and drain maintenance cost guide as a broad planning reference, not a substitute for a site-specific quote. Small damaged drain sections commonly fall around $250 to $1,250, with plumbing labor often ranging from $75 to $250 per hour. Simple drain cleaning is commonly $100 to $350. Complex root intrusion or main-line damage can reach $400 to $2,500 or more, while full drain-line replacement may reach $15,000 to $20,000.
Repair Scenario | DIY Cost Range | Professional Cost Range | Break-Even Trigger |
|---|---|---|---|
Stopper or visible debris | Tool or replacement-part purchase | Often part of a service visit | Stop if access is damaged or the leak remains |
Localized sink clog | Plunger or hand-auger purchase | Simple drain cleaning, $100 to $350 | A second failed method or recurring blockage |
Trap or small drain-section repair | Replacement parts and basic tools | Small damaged-section repair, $250 to $1,250 | Brittle fittings, cabinet leaks, or uncertain reassembly |
Branch or main-line issue | Not a sensible DIY budget | $400 to $2,500 or more for complex cases | Multiple fixtures, sewage odor, or cross-fixture backup |
Full drain-line replacement | Not a practical homeowner repair | Up to $15,000 to $20,000 | Confirmed widespread line damage |
The table helps separate a manageable fixture problem from work that belongs on a professional quote. DIY makes sense when the blockage is localized, the fittings are accessible, and you can test for leaks afterward. Stop when a fitting is brittle, water remains behind the wall, several fixtures are affected, or the repair requires opening finished surfaces.
A service visit costs more than a tool, but the fee may include diagnosis, correct access, cleanup, and a repair warranty. Ask what the quote covers before work begins. If your likely DIY spending approaches the local service-call minimum, or two reasonable methods have already failed, an assessment from 1st Choice Home Repairs can prevent a small leak from damaging the cabinet, flooring, or stored contents. Review financing options from 1st Choice Home Repairs if the provider offers them for the proposed work, subject to its terms and approval.
Troubleshooting Recurring Clogs, Gurgling, and Sewer Odor
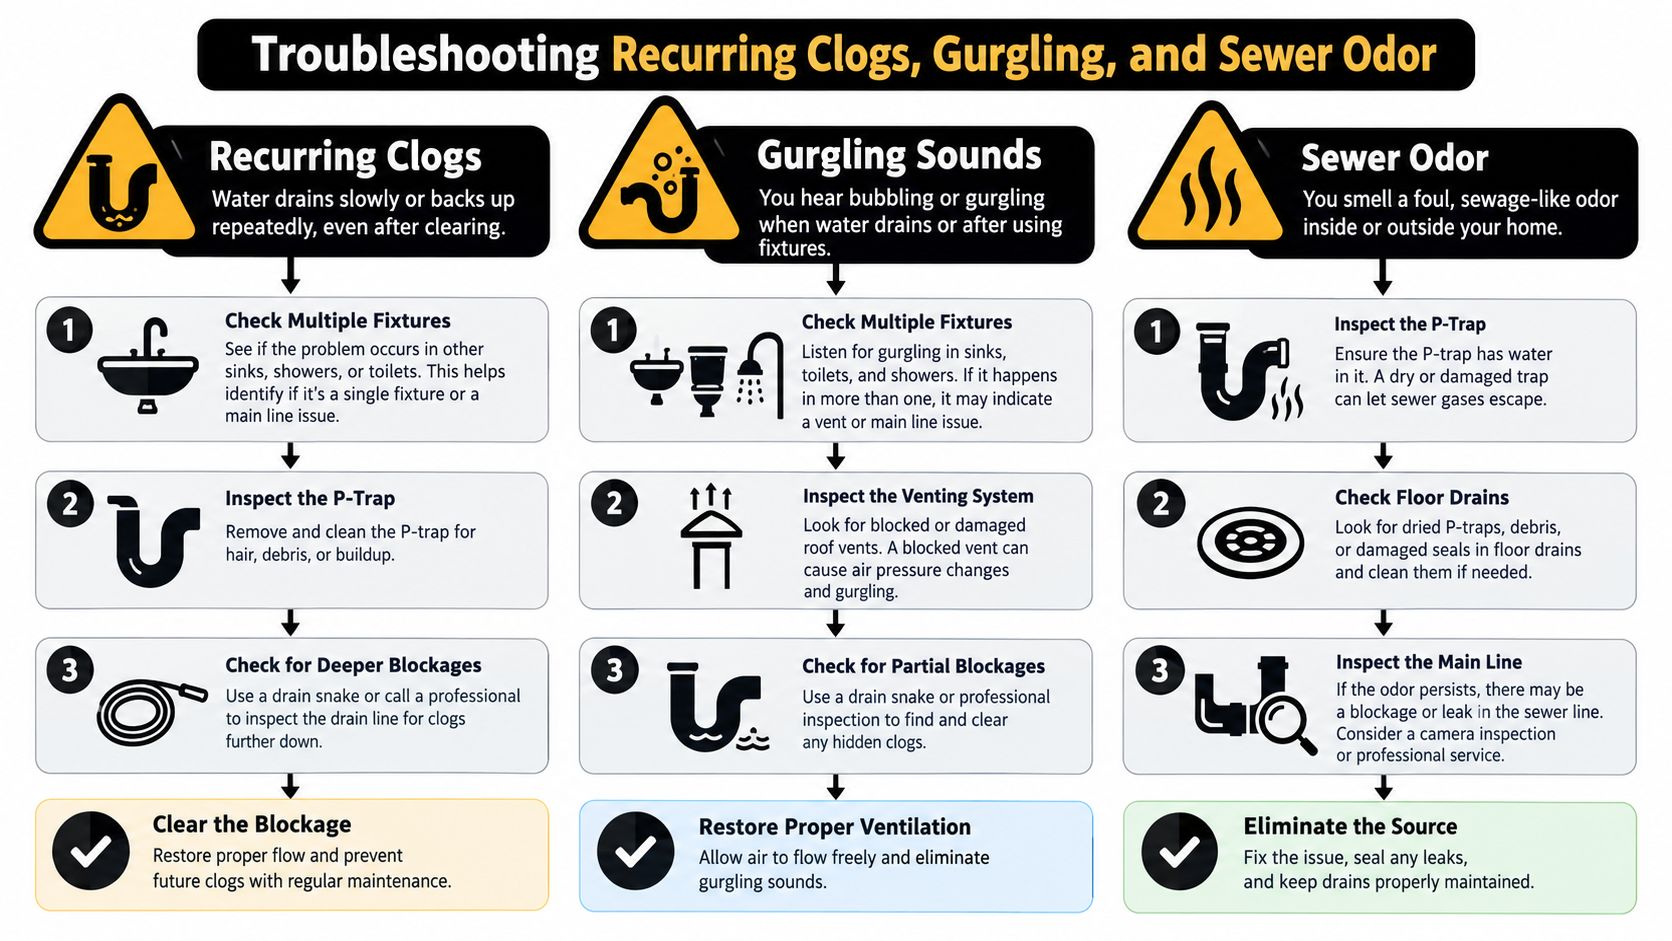
Recurring clogs, gurgling, and sewer odor are not three unrelated annoyances. Together, they tell you how far the problem may extend and whether the next step should be another mechanical clearing or a professional inspection.
Use the symptom combination
If one sink clogs once and the trap contains obvious debris, clean the trap or use a hand auger. If water flows normally afterward, monitor the fixture and adjust what enters the drain. That is a reasonable DIY finish.
If the clog returns quickly, don't assume the first clearing failed because you lacked force. A tool may have opened a narrow path through grease, soap, or other buildup without cleaning the pipe walls. A stronger mechanical service, drain cleaning, or inspection may make more sense than repeating the same attempt.
Gurgling from more than one fixture changes the decision. Check whether tubs, showers, toilets, or another sink drain slowly. Multiple affected fixtures can indicate a main drain or sewer issue, especially when water backs up somewhere else. Stop using large amounts of water and arrange professional inspection rather than feeding a cable blindly into one sink.
Sewer odor deserves the same caution. Clean the stopper and inspect the P-trap for a dry seal or leak, but persistent odor, especially with gurgling or backups, warrants a professional call. Don't mix chemicals, and tell the technician if any drain cleaner has already gone into the basin.
Stop point: One localized clog may justify DIY. A recurring clog combined with gurgling, sewer odor, or another affected fixture deserves diagnosis before another clearing attempt.
Hydro jetting may be considered for tough buildup, but it isn't automatically the right answer for a sink. Market coverage describes it as a fast-growing method, while independent cost reporting places basic snaking around $100 to $275 and hydro jetting around $250 to $800. Those figures come from this recent drain-repair technology overview, and a technician should first confirm that the pipe condition and access justify the method.
A visual demonstration can help you recognize the difference between a fixture-level attempt and a situation that needs escalation.
When to Call 1st Choice Home Repairs for Sink Drain Repair
Call for help when the job stops being a controlled fixture repair. A wet cabinet floor, a corroded metal trap, a damaged stop valve, or a connection that won't separate safely can turn a short weekend task into water damage. The same applies when reaching the suspected obstruction requires modifying the drain stack, vent, or a pipe inside the wall.
The strongest escalation signals are easy to remember:
Water stains or active dripping: Protect the cabinet and floor, then stop using the fixture until the source is known.
Several affected fixtures: Treat shared backups as a possible branch or main-line issue rather than a stubborn sink clog.
Persistent sewer odor: Don't rely on fragrance, hot water, or repeated chemical treatments to mask it.
Corroded fittings: Old metal can crumble when disturbed, leaving you with a larger open connection.
Repeated failure: If the sink slows again soon after clearing, the remaining buildup or line condition needs attention.
Wall or vent work: Drain-stack and vent modifications require more than basic under-sink access.
1st Choice Home Repairs serves St. Charles, O'Fallon, Lake St. Louis, Chesterfield, Wildwood, St. Peters, Ballwin, and nearby communities. Its handyman service provides a route for homeowners who need coordinated repair work rather than trying to manage diagnosis, parts, and follow-up alone. Confirm the exact scope, pricing, and any applicable warranty before authorizing the job.
Financing can also reduce the pressure of an unexpected repair, but terms depend on the available program and approval. The practical benefit is having a way to evaluate the correct repair instead of choosing the cheapest temporary fix because the problem appeared at an inconvenient time.
Use the phone when you can answer yes to any of these questions: Is water escaping? Are multiple fixtures involved? Is sewer odor present? Has the clog returned? Would the next step require opening a wall, stack, or vent? If the answer is no across the board, a careful plunger, auger, or P-trap inspection may be appropriate.
Quick Answers to Common Sink Drain Repair Questions
How long should a stubborn clog take to clear? A localized clog may respond during a careful sequence of plunging, trap cleaning, or hand-auger work. If the sink remains full after reasonable mechanical attempts, or the blockage returns soon afterward, stop repeating the same method and seek diagnosis.
What does a service call cost? A simple drain cleaning commonly falls between $100 and $350, while a small damaged drain section may cost about $250 to $1,250, according to the repair cost guidance cited earlier. Local quotes vary, so ask whether inspection, labor, parts, cleanup, and warranty are included.
Does basic sink drain repair carry a warranty? That depends on the contractor, the part, and the work performed. Ask for the warranty terms in writing, including what isn't covered and whether recurring blockages count as a new issue.
How quickly can a slow leak cause water damage? Don't wait for visible swelling or staining. A slow leak can repeatedly wet cabinet materials and flooring, so place a container beneath the connection and arrange repair as soon as you confirm the source.
What indicates a problem beyond the trap? Multiple slow drains, gurgling, sewer odor, cross-fixture backups, or a clog that returns quickly point beyond a simple trap cleaning. Those signs justify professional inspection.
The decision rule is simple. Inspect first, use mechanical methods for a localized clog, replace a clearly damaged accessible part, and call for help when the symptoms spread beyond the sink or the plumbing won't come apart safely.
If your sink drain is leaking, repeatedly clogging, or showing signs of a larger drainage problem, 1st Choice Home Repairs can help assess the repair and coordinate the next step. Visit 1st Choice Home Repairs to request service information for your home in the St. Charles, O'Fallon, Lake St. Louis, Chesterfield, Wildwood, St. Peters, Ballwin, or nearby area.
Comments