
How to Repair a Fence Without Replacing It

The fence usually announces trouble before it fails completely. You notice a section leaning after a storm, the gate dragging across the ground, or one picket hanging loose, and the first instinct is to shove it upright and add a few screws. That can work when the damage is isolated. It's a waste of a Saturday when the post has already rotted below the soil.
The practical question isn't only how to repair a fence. It's whether the fence still has enough sound structure to make a repair worthwhile. A well-maintained wood fence commonly lasts about 10 to 20 years, with pressure-treated pine often listed at 10 to 15 years and cedar or redwood at 15 to 20 years, according to this wood fence lifespan guide. Use the inspection routine below to separate a fixable component from a failing fence system.
Diagnosing What Your Fence Actually Needs
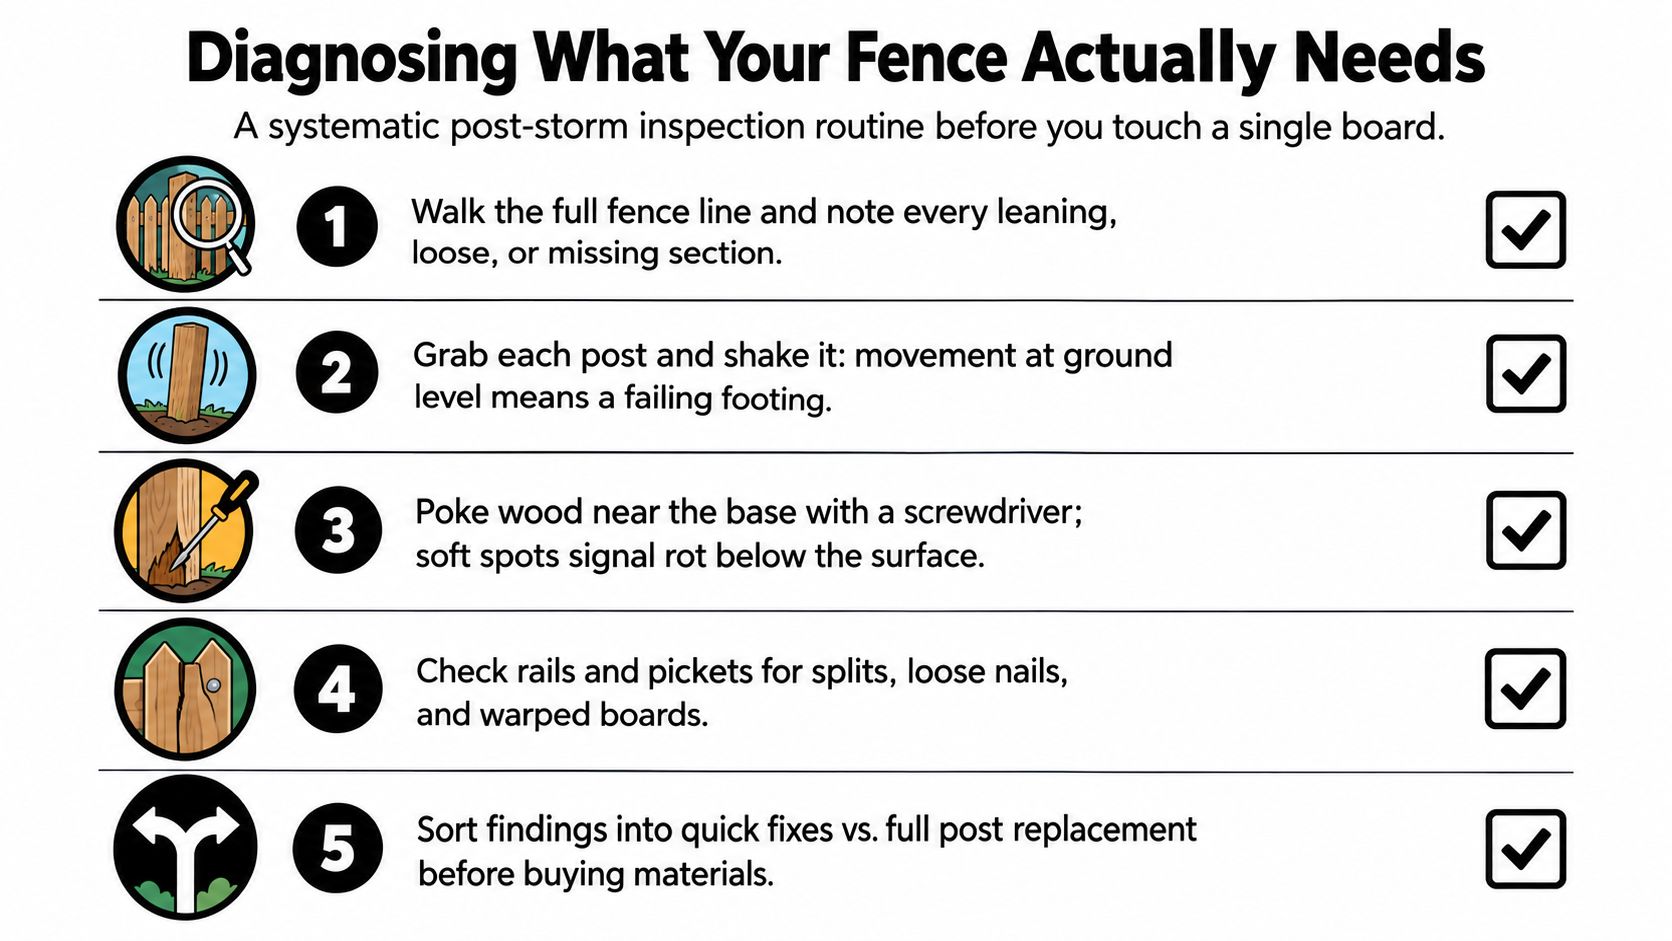
A leaning section after a storm can look like a simple alignment problem. Before pushing it back, walk the entire fence line at arm's length and inspect every connection. A fence often fails at the post base, while the visible symptom appears several feet away in a sagging rail or misaligned gate.
Start at the ground
Grip each post near shoulder height and push it sideways. Movement at the ground line matters more than movement in the boards. A post that flexes while the surrounding rails remain tight may have a loose footing, rot below grade, or soil erosion around the base.
Use a screwdriver to probe the post where wood meets soil. Sound wood resists the tip. Soft, crumbly material means the post is losing its load-bearing capacity, even if the upper portion looks acceptable. Check both sides of the post, because water can remain trapped against one face.
Next, sight along the rails. A straight rail should form a consistent line between posts. A sagging rail may have pulled loose from a connection, split near a fastener, or absorbed enough moisture to warp. Look for rusted nails, popped screws, enlarged holes, and cracked rail ends.
Test the fence as a system
Push each panel gently and watch what moves. If the boards move but the posts stay firm, you may need picket or rail work. If an entire panel shifts, examine the rail-to-post connections and the footing. A cracked vinyl rail can flex in a way that resembles a loose fastener, while a chain-link section can loosen because tension has left the mesh.
The five failure points below account for most repair calls:
Post bases: Leaning, soft wood, soil gaps, and repeated movement indicate footing or rot trouble.
Post tops: Splits and open grain allow water into the post, often starting decay around fasteners.
Rail connections: Loose screws, broken rail ends, and pulled nails let a panel rack out of square.
Individual pickets: Missing, split, or warped boards are usually localized repairs if the rails remain sound.
Gate hardware: Sagging hinges, loose latch plates, and a leaning hinge-side post can make a gate appear to have a hardware problem when the structure is failing.
Practical rule: Write down every defect before you pick up a tool. The visible broken board may be the symptom, not the repair.
Mark each item as cosmetic, component-level, or structural. Count damaged sections, note posts that move at the base, and photograph connections before dismantling anything. That record keeps you from buying pickets when the actual job requires a post replacement.
Deciding Whether to Repair or Replace First
Not every broken fence deserves a patch. Repair makes financial and structural sense when the damage is localized, the posts and rails remain sound, and the work costs less than a meaningful portion of replacement. A useful field rule is to repair when isolated damage affects roughly 20% to 25% or less of the fence and the repair stays below about 50% of replacement cost, as outlined in this repair-versus-replacement decision guide.
The broader household budget supports making that decision early. Independent cost summaries place typical fence repair around $500, with a range of about $200 to $850, while another consumer benchmark puts average repair near $600, with a wider range of $300 to $925. Professional work may run roughly $10 to $50 per linear foot, according to the Angi fence repair cost overview. Those figures are benchmarks, not a quote, but they show why repeated small repairs can approach replacement value.
Use the structure, not the appearance
A fresh coat of stain can make a tired fence look better without restoring its strength. The same applies to adding a second screw beside a rotten rail connection. If the post base is gone, the new fastener has weak wood to hold.
Condition Found | Repair Makes Sense | Replace Instead |
|---|---|---|
One or two broken pickets | Rails and posts are solid, and replacement boards can be secured properly | Damage is spread across many sections or matching boards are unavailable |
One leaning post | Post wood is sound and the footing can be corrected | Multiple posts are soft at the soil line or footings have failed repeatedly |
Loose rail connection | Rail end is intact and the post has solid fastening wood | Rails are twisted, split through, or failing across several spans |
Sagging gate | Hinges and latch are serviceable, and the hinge-side post is stable | The gate frame is distorted or the hinge-side post is rotten |
Older wood fence | Maintenance can protect sound material and buy useful service life | Repair spending exceeds about half of replacement cost |
Recurring repairs | Problems remain isolated and each fix addresses the cause | Annual repair spending reaches roughly 15% to 20% of replacement cost, or more than 25% to 30% of posts are compromised, according to the same decision guidance |
A preventive maintenance program can extend a wood fence's life by 5 to 7 years at roughly 20% of replacement cost, according to this repair cost and maintenance analysis. That only works when the underlying structure is still worth preserving. If the fence has widespread rot, replacement is not giving up. It's avoiding a series of repairs that never restore the load path.
Tools and Materials for Wood, Vinyl, and Chain-Link Fences
Fence material determines the repair method more than the visible damage does. Wood accepts replacement parts and new fasteners. Vinyl depends on compatible profiles and adhesive. Chain-link requires tension, alignment, and specialized connectors rather than ordinary screws.
Match the kit to the fence
For wood, expect to work with a drill-driver, circular saw, pry bar, sledgehammer, level, post-hole digger or auger, and exterior-rated screws. Keep galvanized nails, treated replacement boards, rails, wood preservative, gravel, and concrete available. A pry bar helps remove boards without damaging a sound rail, while a circular saw lets you cut out a failed section cleanly.
Vinyl repairs need a different mindset. Gather PVC cleaner, slip-joint pliers, replacement rails or picket sections, manufacturer-matched vinyl adhesive, and temporary zip ties for alignment. A heat gun can make vinyl more flexible in cold weather, but excessive heat can distort the profile. Don't force a replacement part into a channel that has a different shape.
Chain-link work calls for fence pliers, a come-along, a fence stretcher, tension bands, brace bands, replacement mesh, and top or bottom rail sections. A fence weave or short length of matching wire can splice a small tear. A bent rail sleeve may require careful disassembly at the terminal post rather than brute force.
Tool or Material | Wood | Vinyl | Chain-Link |
|---|---|---|---|
Level | Essential for posts, rails, and gates | Useful for posts and rails | Useful for terminal posts and rails |
Drill-driver | Exterior screws and pilot holes | Hardware and temporary alignment | Limited use, mostly for brackets |
Pry bar | Removing damaged boards | Rarely appropriate | Not used for mesh repair |
Post-hole digger or auger | Frequently needed | Needed for structural post work | Needed for loose terminal posts |
Concrete and gravel | Footing resets and post replacement | Structural reinforcement | Resetting terminal posts |
Adhesive | Wood preservative and coating, not structural glue | PVC cleaner and matched adhesive | Not normally used |
Fence stretcher or come-along | Not required | Not required | Essential for restoring mesh tension |
Specialty item | Auger or rented post driver | Matching profile sections | Fence stretcher, crimpers, or mesh tools |
Rent the tools that change the job
A post-hole auger, powered driver, or fence stretcher may be sensible to rent when the job is otherwise straightforward. Buying specialty equipment for a single repair can distort the budget. Hand tools, a quality level, and a drill-driver remain useful for future maintenance, but the tool should follow the diagnosis rather than lead it.
Protective equipment matters as much as the hardware. Wear gloves when handling splintered wood or chain-link, eye protection when cutting fasteners, and sturdy footwear around open post holes. Call a utility-location service before digging. A clean repair starts with knowing what's below the fence, not just what's above it.
Step-by-Step Fence Repair Techniques That Hold Up
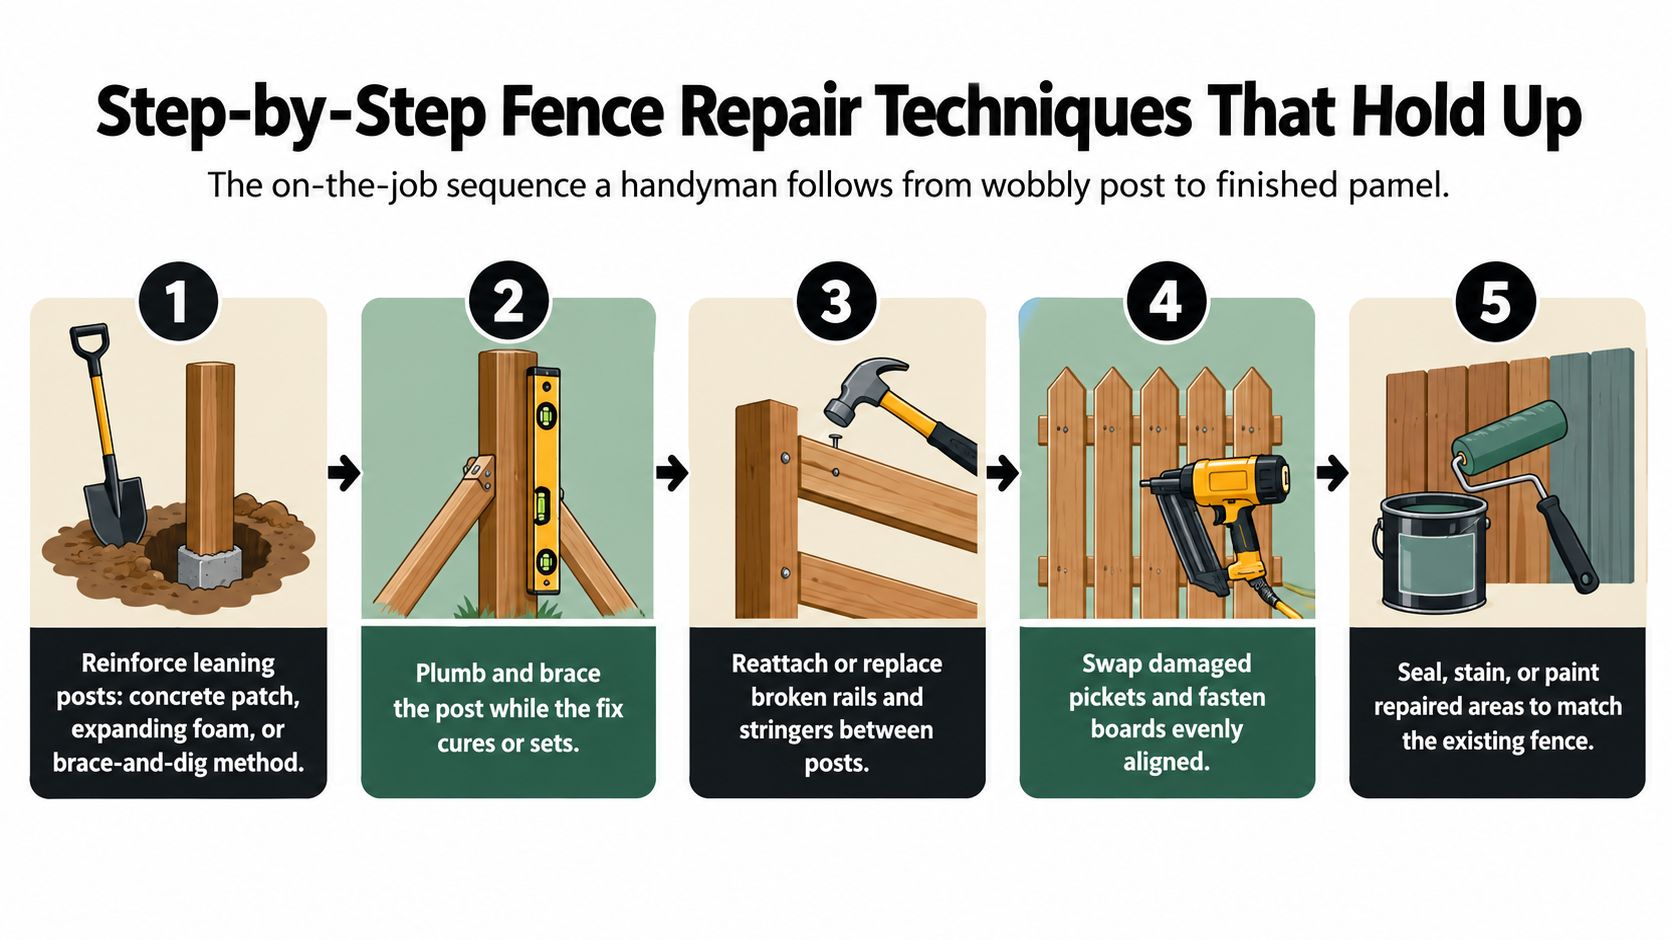
The sequence matters. Stabilize the structure first, then repair the parts attached to it. Replacing pickets before correcting a leaning post often leaves you with straight boards on a moving frame.
Secure the post before the panel
Brace the panel on both sides so its weight doesn't pull on the post while you work. Expose the base by removing soil and loose concrete. If the post is sound, plumb it with a level and brace it temporarily. Depending on the footing and access, a concrete patch, expanding foam made for post stabilization, or a brace-and-dig correction may be appropriate.
Expanding foam is convenient, but it isn't a cure for rotten wood. It can stabilize a sound post in suitable conditions, yet it won't restore a post that has lost its structural core. For a failed post, remove the attached rails, dig out the old material, and set a treated replacement post with gravel for drainage and concrete where appropriate.
Allow the new footing to set according to the product instructions before loading it with the fence. The Home Depot fence repair guide describes typical repair work around post assessment and notes that post replacement averages about $270, while leaning-fence correction often falls around $200 to $400. Those benchmarks reinforce the main point, post work is usually the structural part of the repair.
Rebuild the wood section
Once the posts are stable, remove damaged boards with a pry bar or saw. Reattach a sound rail to the post with corrosion-resistant exterior screws, using pilot holes near rail ends to reduce splitting. If a rail has a localized split, sister it with a sound piece of treated lumber that extends beyond the damaged area and fasten both pieces into solid wood.
Replace individual pickets without removing the neighboring boards unless they block access. Match the existing exposure and keep the board tops aligned with a straightedge. Use galvanized nails or exterior screws, but don't overdrive fasteners into weathered wood.
For a visual example of the work sequence, see the fence repair portfolio. The finished repair should be sealed, stained, or painted after the wood is dry and clean. New boards may not match older weathered boards immediately, so prioritize sound fastening and moisture protection over trying to disguise every color difference.
The embedded demonstration below provides another visual reference before you start cutting or dismantling a panel.
Handle vinyl and chain-link differently
For vinyl, clean the damaged area with a PVC-safe cleaner, align the replacement rail or picket, and use adhesive specified for the product. Temporary zip ties can hold alignment while the adhesive sets. Replace caps with matching parts rather than gluing a cracked cap over an unstable post.
Chain-link repairs begin by releasing tension safely. Remove the damaged mesh section, weave in matching mesh, and reconnect the fabric with a fence weave. Tighten the top and bottom tension wire, replace damaged bands, and use a come-along or fence stretcher to bring the mesh back to an even line. A bent top rail sleeve should be replaced rather than straightened repeatedly, because each bend weakens the fit.
Troubleshooting Common Fence Repair Problems
A repair that fails twice usually points to a missed structural cause. The most useful troubleshooting question is, “What part is still moving?” Watch the connection while someone operates the gate or pushes the panel. The moving component usually identifies the actual fault.
The gate keeps sagging after new hinges
A homeowner replaces the hinge set, tightens every screw, and still finds the gate scraping the ground. The hinge hardware wasn't necessarily defective. A rotted hinge-side post can't hold the screws under the gate's weight, so the new hardware pulls against failing wood.
Remove one hinge and probe the post around the fastener holes and soil line. If the wood is soft, install a proper repair spike only when the remaining post and soil conditions support that method. Otherwise, replace the post, plumb it, and rehang the gate after the footing is stable.
The reset post loosens again
A post that pulls loose after being reset in concrete often has a footing problem rather than a fastener problem. In clay soil, a shallow hole can shift as moisture changes, while trapped water accelerates decay around the base.
Remove the loose material and inspect the hole. Improve drainage with crushed stone, set the post plumb, brace it in two directions, and use the appropriate concrete system. Don't attach the panel while the footing is still moving. A straight post attached too early will transfer movement into the rails.
A post can look plumb at the top and still fail at the soil line. Always test the base before replacing the hardware above it.
The vinyl panel pops out repeatedly
If a vinyl panel keeps leaving its rail, don't wedge it back in with extra force. Check the routed openings, rail dimensions, and replacement profile. A heavier-gauge rail or manufacturer-matched section may be needed when the original rail has deformed.
Wind-snapped rails call for the same discipline. Replace the damaged span, inspect the post connection, and check adjacent panels for stress. Rusted fasteners may snap during removal, so cut them carefully and replace them with compatible corrosion-resistant hardware. If a fastener hole has enlarged in rotted heartwood, moving the screw a short distance won't restore holding power. Replace or reinforce the affected structural member instead.
Time, Cost, and When a Pro Saves You Money
Repair budgets fail when homeowners count lumber but forget concrete, delivery, tool rental, disposal, and the time required to expose a post. National benchmarks place typical fence repair around $304 to $948, with post replacement averaging about $270, according to the Home Depot repair cost reference. Another independent summary places average repair near $500, with common projects ranging from $200 to $850, as noted in the earlier cost benchmark.
The numbers below are planning ranges, not promises. Material prices vary by fence profile, access, damage, and whether the existing components can be reused.
Repair Type | Material Cost | Time (DIY) | DIY or Call Pro |
|---|---|---|---|
Replace an isolated wood picket | Qualitative, usually modest | A short work session | DIY when rails and posts are sound |
Replace a wood post | Varies with post, gravel, and concrete | Several hours | DIY if digging and bracing are manageable |
Correct a leaning fence | Varies by footing condition | A substantial work session | Call a pro when the footing has failed |
Replace a vinyl rail or picket | Replacement part plus adhesive | A short work session | DIY if the profile matches exactly |
Patch chain-link mesh | Mesh, wire, and connectors | A short work session | DIY for a small tear, pro for tensioned runs |
Replace a chain-link top rail | Rail, sleeve, and fittings | Longer than a patch | Call a pro when multiple connections must be released |
Reframe a sagging gate | Hardware plus structural material | A substantial work session | Pro when the hinge-side post is compromised |
Score the job before committing
Use four questions. If the answer to any one is unfavorable, get an estimate before buying materials.
Cause: Can you identify the failed component, or are you treating a symptom?
Structure: Are the posts and rails solid when pushed and probed?
Access: Can you dig, brace, cut, and remove the old material without damaging nearby property?
Scope: Does the job involve multiple posts, concrete work, a gate frame, or a shared property line?
A single board replacement is a sensible DIY project. A multi-post repair can become a different job once every panel must be supported and re-aligned. Professionals also bring equipment for digging, lifting, and setting posts, along with a process for working around gates, slopes, landscaping, and neighbors.
For homeowners comparing service options, 1st Choice Home Repairs' handyman services include exterior work such as fencing. Ask what the estimate covers, whether disposal is included, how the crew handles hidden rot, and what labor warranty applies. A clear scope is more useful than a low starting price that excludes the structural work.
Calling 1st Choice Home Repairs for Fence Work in St. Charles
DIY fence work makes sense when the damage is isolated and the structure is sound. Replacing a picket, tightening a latch, or reattaching a loose rail can save money when you can reach solid material and keep the repair aligned. Structural work changes the calculation.
Post-footing repairs on heaving or rotted bases, several connected panel replacements, and gate work that involves a failing hinge-side post deserve a careful estimate. Shared property lines add another layer of risk because a misplaced post, altered boundary, or damaged neighbor-side finish can create a dispute that costs more than the original repair.
Where local experience helps
St. Charles-area fences deal with soil movement, moisture, frost, wind, and local installation requirements. A professional crew can assess whether the post needs a deeper or better-drained footing, whether the existing material can support a repair, and whether an HOA standard affects height, style, or finish. Those details matter most when the fence is leaning because of a failed base rather than a loose board.
1st Choice Home Repairs provides fencing and broader handyman services in St. Charles and nearby communities, including O'Fallon, Lake St. Louis, Chesterfield, Wildwood, St. Peters, and Ballwin. The company's stated background includes 25 years of hands-on experience, and its service approach includes upfront communication, project-specific pricing, and labor backed by a warranty. Confirm current scope and warranty terms during the estimate.
Prepare for the visit
A useful booking starts with accurate information. Take photos from both sides of the fence, mark the sections that move, and note whether the problem appeared after a storm or has developed gradually. Tell the company about gates, pets, landscaping, irrigation, property-line concerns, and any HOA communication.
During the on-site estimate, ask the technician to separate cosmetic work from structural work. You should understand whether the recommendation is to replace a post, reinforce a rail, rebuild a gate, or replace a larger section. You should also receive a clear explanation of what happens if the crew uncovers rot below grade.
Use the 1st Choice Home Repairs contact page to request an assessment and discuss the repair before committing to materials. Hiring a professional isn't automatically the expensive choice. When the job requires digging, concrete, multiple alignments, or a warranty-backed result, it can be the shorter and more reliable path.
1st Choice Home Repairs offers fence repairs, fencing work, and handyman support for homeowners who need more than a loose board tightened. If your fence has structural damage, failing posts, a sagging gate, or several affected sections, visit 1st Choice Home Repairs to arrange a repair assessment in the St. Charles area.
Comments