
How to Build a Backyard Deck That Lasts for Years

A lot of deck projects start the same way. You step out the back door, look at a patch of grass, a cracked patio, or a muddy area nobody uses, and think, we'd spend time out here if this space worked. That instinct is usually right. A good deck can turn a dead part of the yard into the place where dinner happens, where kids spread out, where the grill finally has a proper spot, and where the back of the house feels finished.
The part most homeowners underestimate is that a deck isn't just a platform with boards on top. It's layout, drainage, permits, framing, fastening, stairs, and long-term weather exposure all working together. If one of those gets handled badly, the deck may still look fine on day one, but it starts showing problems fast. That's where sagging corners, trapped moisture, wobbly rails, and callbacks come from.
In St. Charles County, I've seen the same pattern for years. People focus on the visible parts first: board color, rail style, maybe where the stairs should land. Those matter. But the decisions that make a deck last usually happen before the first footing gets dug. Size, beam direction, post placement, sun exposure, drainage away from the house, and whether the job needs inspections all affect how smooth the build goes and how well it holds up.
Introduction to Building a Backyard Deck That Fits Your Home
A backyard deck works best when it solves an everyday problem. Sometimes that problem is simple. The back door opens to a step down into wet grass. The grill sits crooked on pavers. The patio gets too hot, too exposed, or too cramped. Other times it's more about how the house functions. You need a cleaner transition from kitchen to yard, a place for outdoor seating, or a safer surface for family traffic.

The strongest deck plans start with how the space will get used. A grilling deck near the house gets laid out differently than a full entertaining deck with stairs to the yard. A quiet morning coffee spot doesn't need the same footprint as a deck that has to handle seating, a table, and regular foot traffic. If you skip that thinking and jump straight to materials, you usually end up rebuilding part of the plan on the fly.
Start with use, not size
Homeowners often ask how big the deck should be. The better question is what needs to fit on it without feeling crowded. Grill, dining set, lounge seating, planter boxes, traffic path from the door, maybe a stair run. Once those uses are clear, the shape gets easier.
A few practical questions sort this out fast:
Entry point: Does the deck need to align with one back door, a sliding patio door, or multiple exits?
Sun and shade: Will the space get baked in afternoon sun, or does a tree line make it comfortable later in the day?
Privacy: Are you building for family use, entertaining, or a little separation from close neighbors?
Yard flow: Do kids, dogs, or guests need an easy path off the deck into the yard?
Future add-ons: Will you want lighting, bench seating, skirting, or a pergola later?
Those answers shape everything else. They affect whether an attached deck makes sense or whether a freestanding layout gives you more flexibility. They also determine whether you need broad stairs, a simple landing, or more open usable floor area.
Practical rule: If you can't sketch where people will sit, stand, cook, and walk, the deck design isn't ready yet.
What works in real backyards
The decks that age well usually aren't the fanciest. They're the ones matched to the house and site. A modest rectangular deck with good framing, proper drainage, clean stairs, and enough room to move is better than an oversized layout with awkward corners and moisture trouble near the foundation.
I've also seen plenty of homeowners take on a deck because the surface looks straightforward. Then they hit the parts that separate a decent DIY build from a reliable one: square layout, footing locations, ledger attachment, beam sizing, and stair geometry. That's where projects stall out.
Here's a simple way to judge whether you should build it yourself or bring in help:
DIY is realistic when the deck is low, simple in shape, easy to access, and you're comfortable reading plans, measuring accurately, setting structure level, and dealing with permits.
Hire help when the deck attaches to the house, includes stairs and railings, needs inspection coordination, or sits on a yard with slope, drainage issues, or tight access.
Definitely call a pro if you're unsure how to size framing members from code tables or how to make structural connections that will pass inspection.
The mindset that saves money later
Shortcuts on decks usually look like savings at first. Fewer footings. Lighter framing. Improvised flashing. Stair layout by eye. Posts set where they're convenient instead of where the structure wants them. Those decisions come back later as movement, rot, cracked boards, or failed inspections.
A better approach is simple. Treat the deck like part of the house exterior, not patio furniture. It needs structure underneath, water management around it, and a layout that still makes sense years from now.
That's the difference between a deck that gets used constantly and a deck that becomes another repair project.
Planning Your Deck Design and Handling Permits and Inspections
A deck can look perfect on paper and still fail in the yard.
I see it all the time in St. Charles County. Homeowners sketch a 16 by 20 rectangle, price the boards, and feel ready to go. Then the constraints show up. The back door sits higher than expected. The stairs land in the only dry traffic path. The beam line wants to run right through a downspout discharge area. The permit set needs footing sizes and framing spans they have not worked out yet.
Good planning solves those problems before concrete, lumber, and inspection dates start costing money.
Start with the yard, not the software
Before you settle on shape or size, mark the deck full scale in the yard with stakes and string. Walk it from the back door, from the patio, and from the far corner of the lot. A layout that feels generous on a screen can feel oversized once you see how much grass it takes, or too tight once you account for stairs and railings.
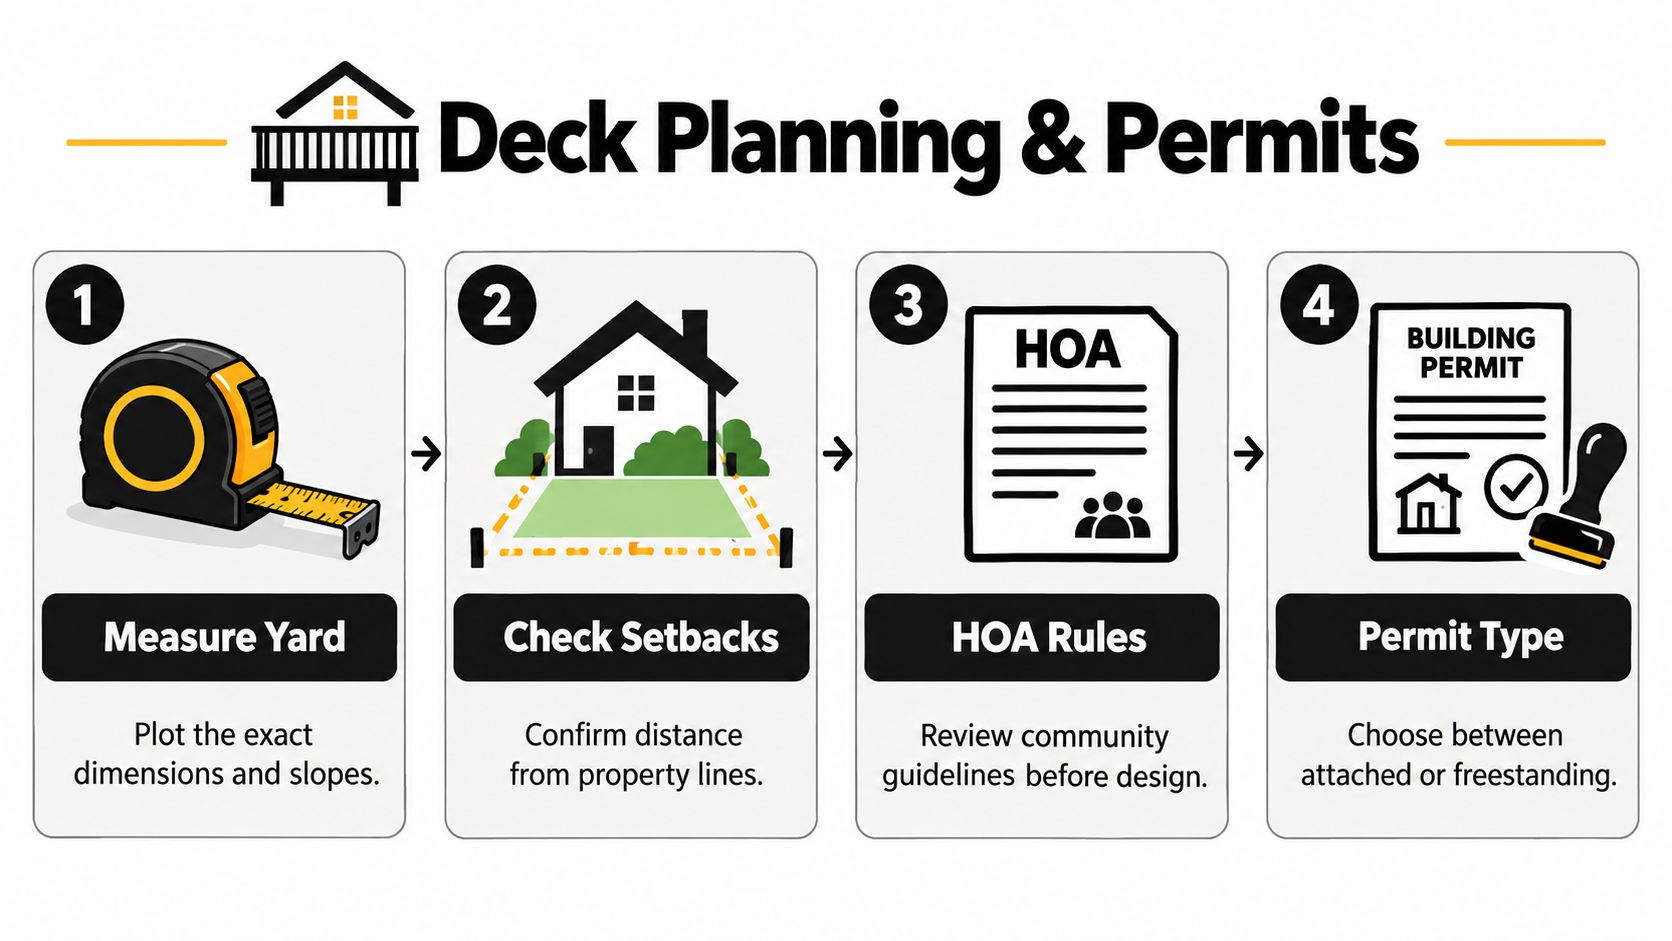
Check these early:
Door height and swing: The step down from the threshold affects the whole deck elevation.
Stair landing space: Straight stairs are easier to build, but they need room to finish safely at grade.
Water paths: Downspouts, low spots, and splash areas matter because wet soil and trapped moisture shorten deck life.
Obstructions: AC pads, gas meters, hose bibs, cleanouts, and basement windows can force changes to post and stair locations.
Sight lines and privacy: Railing height, stair direction, and deck elevation change how the yard feels from inside the house.
Size the structure from code tables before you finalize the layout
A lot of DIY plans go sideways here. The deck shape gets drawn first, and the structure is forced to fit later. That is backwards.
Joist spans, beam spans, post spacing, footing size, stair geometry, and guard details all need to work from the start. If the code span tables say your joists need to be shorter, the beam has to move. When the beam moves, the posts move. When the posts move, one of them usually lands where you wanted open space, a stair run, or a clean drainage path.
That is why simple rectangles are still hard to beat. They waste less material, frame faster, and make inspections cleaner. Diagonal decking, picture-frame borders, bump-outs, and wrap sections can look good, but every one of those choices affects joist layout, blocking, fastener count, and labor time.
Attached or freestanding changes more than people expect
An attached deck saves some space and usually feels more integrated with the house. It also brings the ledger, flashing, and house connection into play. If those details are wrong, the callback is not cosmetic. It is structural rot, water entry, or both.
A freestanding deck avoids tying into the house structure, which can simplify some situations, especially near brick veneer, older band boards, or questionable wall conditions. The trade-off is more footings, more framing, and tighter control of elevation because the deck has to support itself completely.
Neither option is automatically better. The right call depends on the house wall assembly, deck height, drainage, and whether the added footing work costs less than solving a difficult ledger condition.
Permit timing affects your build schedule
Permit review is part of the job, not paperwork you handle after ordering material. In many areas, approval can take days or weeks. If you schedule labor, reserve dumpsters, or order special-order railing before the permit is in hand, you can burn time and money fast.
A permit-ready plan usually includes:
Site plan with the deck location and property line setbacks
Deck dimensions including projection, width, elevation, and stairs
Framing layout showing joists, beams, posts, and footings
Attachment details if the deck connects to the house
Guard and stair details if the deck height requires them
Inspectors usually are not looking for fancy drawings. They want clear information that matches the build in the yard.
Plan for inspections while the structure is still visible
Inspection delays usually come from sequencing mistakes. Footings get poured before layout is settled. Hardware gets covered before anyone checks it. Decking goes down before framing is signed off.
A cleaner sequence looks like this:
Stage | What should be ready | Common mistake |
|---|---|---|
Pre-permit planning | Site layout, spans, setbacks, drainage path | Drawing the shape before sizing the structure |
Footing inspection | Marked locations, depths, and sizes | Digging before confirming beam and post layout |
Framing inspection | Ledger or freestanding frame, connectors, stairs in progress if required | Covering critical connections too early |
Final inspection | Decking, rails, stairs, graspable handrail, complete fasteners | Calling for final with trim or safety items missing |
Moisture details belong in the plan, not as field fixes
Water ruins more decks than foot traffic.
The planning stage should account for how water leaves the deck surface, how it stays off the house connection, and how it drains away from footings and stair landings. If a downspout dumps under the deck, fix that on paper before you build. If the grade slopes back toward the house, deal with it before posts and beams lock you into a bad drainage pattern.
This is one place where hiring help often makes financial sense. A low freestanding platform deck with no complicated stairs can be a realistic DIY project for someone who reads plans well and stays disciplined. Once the deck attaches to the house, needs permit drawings that reflect actual span tables, or has drainage and stair layout conflicts, the margin for error gets thin. That is usually the threshold where homeowners call 1st Choice Home Repairs, especially when financing keeps them from cutting corners just to spread out the cost.
The best deck plans do three things at once. They satisfy code, move water where it belongs, and fit how the backyard gets used.
Choosing Materials and Tools for a Durable Low Maintenance Deck
Material selection is where homeowners often spend too much on visible upgrades and not enough on the parts that protect the structure. The deck boards matter, but so do flashing, connectors, fasteners, and the details that keep water from lingering where it shouldn't.
What each decking material is really like to live with
There's no universal best deck board. There's only the one that fits your budget, maintenance tolerance, and how you want the deck to age.
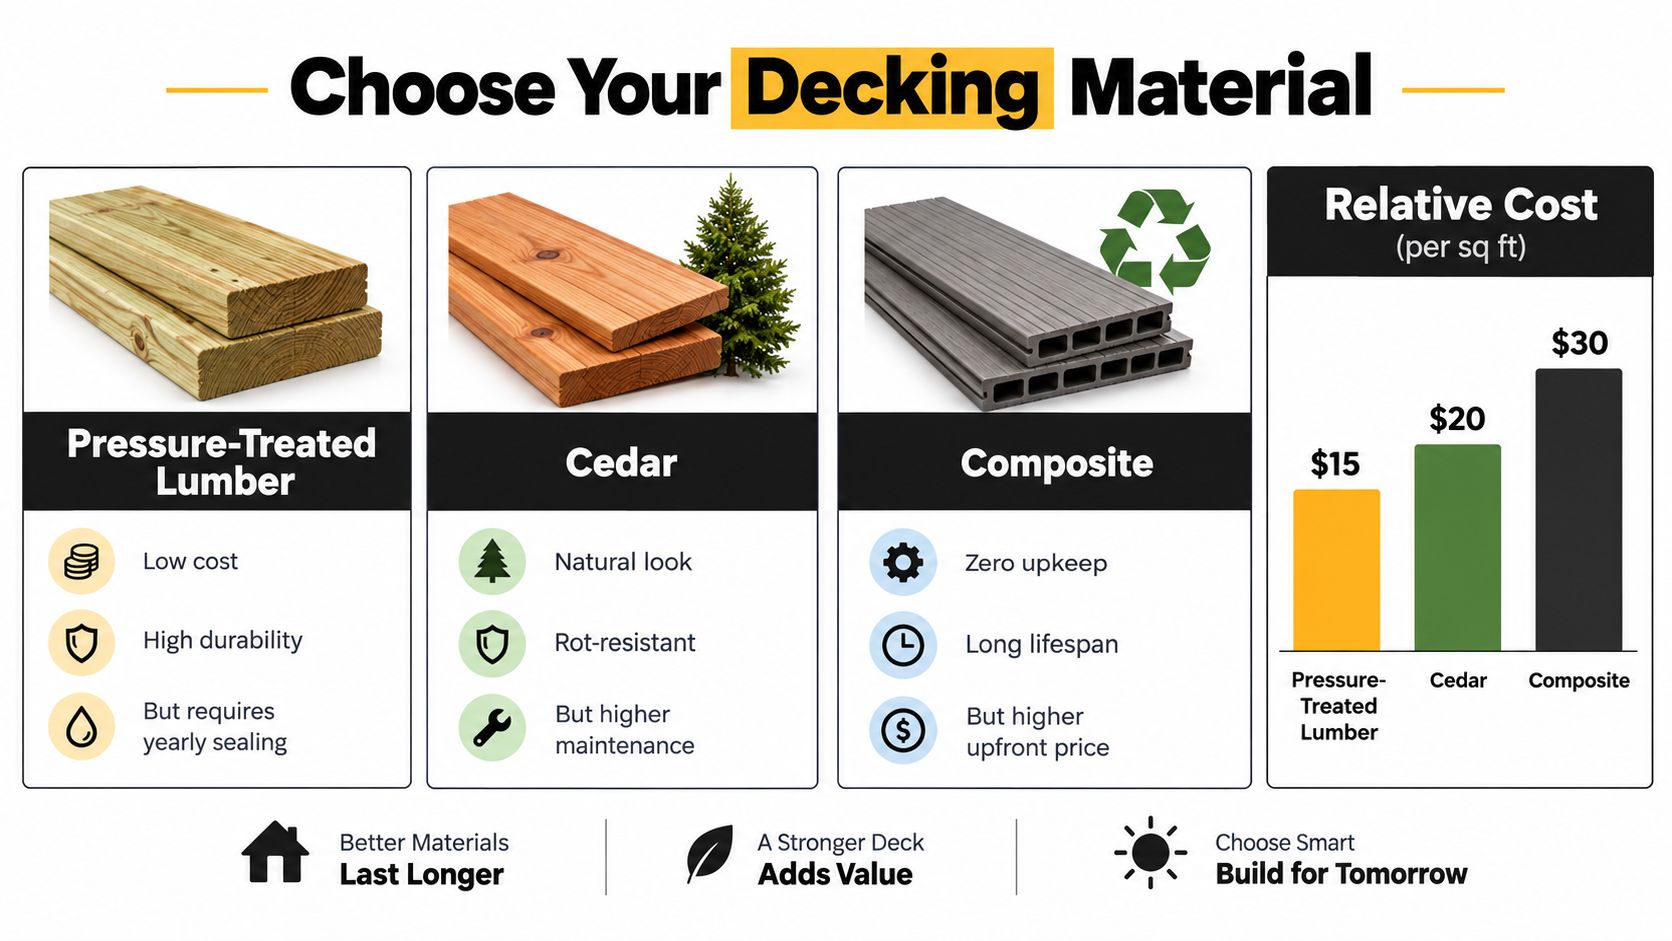
Pressure-treated lumber is still the practical starting point for a lot of backyard decks. It's widely available, structurally familiar, and forgiving on price. The trade-off is upkeep. It needs regular attention, and appearance can vary board to board.
Cedar gives a warmer natural look. Some homeowners prefer it because it feels less utilitarian from day one. The trade-off is that it still needs care, and it's usually chosen more for appearance than for a low-maintenance lifestyle.
Composite works well for homeowners who want less routine upkeep on the walking surface. It's a common fit for busy families who don't want to keep revisiting sanding, sealing, or stain decisions. The trade-off is upfront cost and the need to follow the manufacturer's installation rules carefully.
Material | Upfront Cost | Maintenance Level | Best For |
|---|---|---|---|
Pressure-treated lumber | Lower | Higher | Budget-conscious builds and traditional wood decks |
Cedar | Mid-range | Moderate to higher | Natural wood appearance |
Composite | Higher | Lower | Homeowners prioritizing less surface upkeep |
For local homeowners comparing options, decking services and build options can help clarify whether a wood or composite system better fits the project scope.
Spend carefully on the parts below the surface
A deck fails from hidden details more often than from the face boards. That's why I'd rather see money spent on solid connectors and water control than on decorative extras too early.
Good material decisions usually include:
Structural lumber that matches the plan: Don't substitute smaller framing because it's in stock.
Approved joist hangers and structural connectors: Use the correct hardware for the connector, not whatever fastener is nearby.
Flashing at house connections: This is not a trim detail. It's a water management detail.
Exterior-rated screws and fasteners: Cheap fasteners can create staining, corrosion, or loose connections over time.
Post bases and uplift-resistant hardware where required: Posts shouldn't just sit where water collects.
Moisture control starts before the boards go on
Many deck problems begin with trapped water. Official weathertightness guidance says decks should slope away from the building, avoid ponding, provide sufficient outlets or drains where free drainage isn't possible, keep posts raised above soil or hardscape, and avoid moisture traps from downpipes, dryer vents, or planters as outlined in building moisture guidance.
That guidance lines up with what holds up in the field. If water can't leave, materials stay wet. If materials stay wet, coatings fail faster, framing stays damp, and movement gets worse.
The board you walk on gets the attention. The water path under it decides how long the deck lasts.
Tools that earn their keep
You don't need every specialty tool in the catalog, but you do need the basics that keep layout accurate and cuts clean.
A sensible tool list includes:
Tape measure and chalk line: For layout, over and over.
4-foot level or longer straightedge: Short levels are handy, but longer tools reveal crown and framing errors.
Circular saw and miter saw: One handles breakdown, the other handles repeat cuts cleanly.
Impact driver and drill: Separate tools save time and frustration.
Post hole equipment or rental auger: Worth renting for footing work instead of fighting the ground all day.
Clamps: Useful for straightening boards, holding blocking, and stair work.
Speed square and framing square: You'll use both.
If you're buying tools only for one deck, rent the expensive digging and cutting equipment and spend your money on decent measuring and fastening tools. Bad layout causes more trouble than slow cutting.
Building a Solid Foundation and Framing Your Deck Safely
A deck usually starts going wrong before the first board goes down. The layout is off by an inch, the footing depth gets guessed, the beam lands where the auger fit easiest, and by the time the inspector shows up, the whole frame is fighting itself. I've seen that movie plenty of times in St. Charles County.
Set the structure from lines, permits, and span tables
Pull string lines for the outside perimeter first. Check both diagonals. Check your setback and easement limits before you mark footings, because shifting a beam line after concrete is in the ground is slow, expensive work.
Permit timing matters here too. A lot of homeowners want to dig first and sort paperwork later. That shortcut creates trouble if the approved plan calls for different footing sizes, post spacing, or attachment details than what is already in the yard. In practice, the framing plan, permit set, and footing layout need to match each other before the first hole is dug.
The code side is not academic. It decides whether the deck feels solid or springy, and whether the inspector signs off without a second trip. Prescriptive deck provisions in the IRC are based on 40 psf live load plus 10 psf dead load, with joist, beam, and decking spans tied to lumber size, species, and spacing as shown in prescriptive deck span guidance. Those tables also show the practical trade-offs. A 2x8 Southern Pine joist at 16 inches on-center spans about 11 feet 10 inches, while a 2x10 Southern Pine joist at 16 inches on-center spans about 14 feet. The same guide covers decking span limits, including 1-inch decking at 12-inch centers, 5/4-inch decking at 24-inch centers, and 2-inch decking at 32-inch centers.
That is why real deck framing starts on paper.
A smaller joist can work if the span is short. Tighter spacing can stiffen a deck, but it also adds material and labor. Sometimes adding a beam line saves money better than jumping up in joist size. Those are backyard decisions, not theory.
Footings, posts, and drainage details that prevent callbacks
Place footings from the framing plan, not from where the ground is softest. Posts need to carry load straight down into the footing, and beams need support at locations that make sense for the joist layout. Random post placement leads to chopped-up framing, awkward hardware, and weak load paths.
Water needs a path out from the start. Keep finished grade below framing members, avoid trapping soil around posts and bases, and plan runoff so water does not sit under the deck after every storm. Wet ground under a low deck keeps humidity high, slows drying, and shortens the life of connectors and framing.
Joist layout also needs to match the surface plan. General guidance says joists should be no more than 16 inches on-center for decking installed perpendicular to the joists and no more than 12 inches on-center for diagonal decking, as noted in deck joist layout guidance. If you already know you want a picture-frame border, diagonal field boards, or heavy composite decking, frame for that now. Trying to correct support later usually means extra blocking, extra labor, and a deck that still feels patched together.
A few framing habits keep the work honest:
Crown joists the same direction: Mixed crowns show up fast in the finished surface.
Use a story pole or marked tape: Layout stays consistent across the whole frame.
Check beam tops and joist tops often: One proud member can telegraph through everything above it.
Add blocking where the plan calls for it: Guard posts, board transitions, and stair openings all need real backing.
Leave room for drainage and drying: Tight framing against grade or siding holds moisture where you do not want it.
Good framing is not just strong enough on paper. It also drains, dries, and stays predictable during the finish work.
Here's a useful visual before moving on to the surface work:
The ledger and stairs usually separate DIY jobs from pro jobs
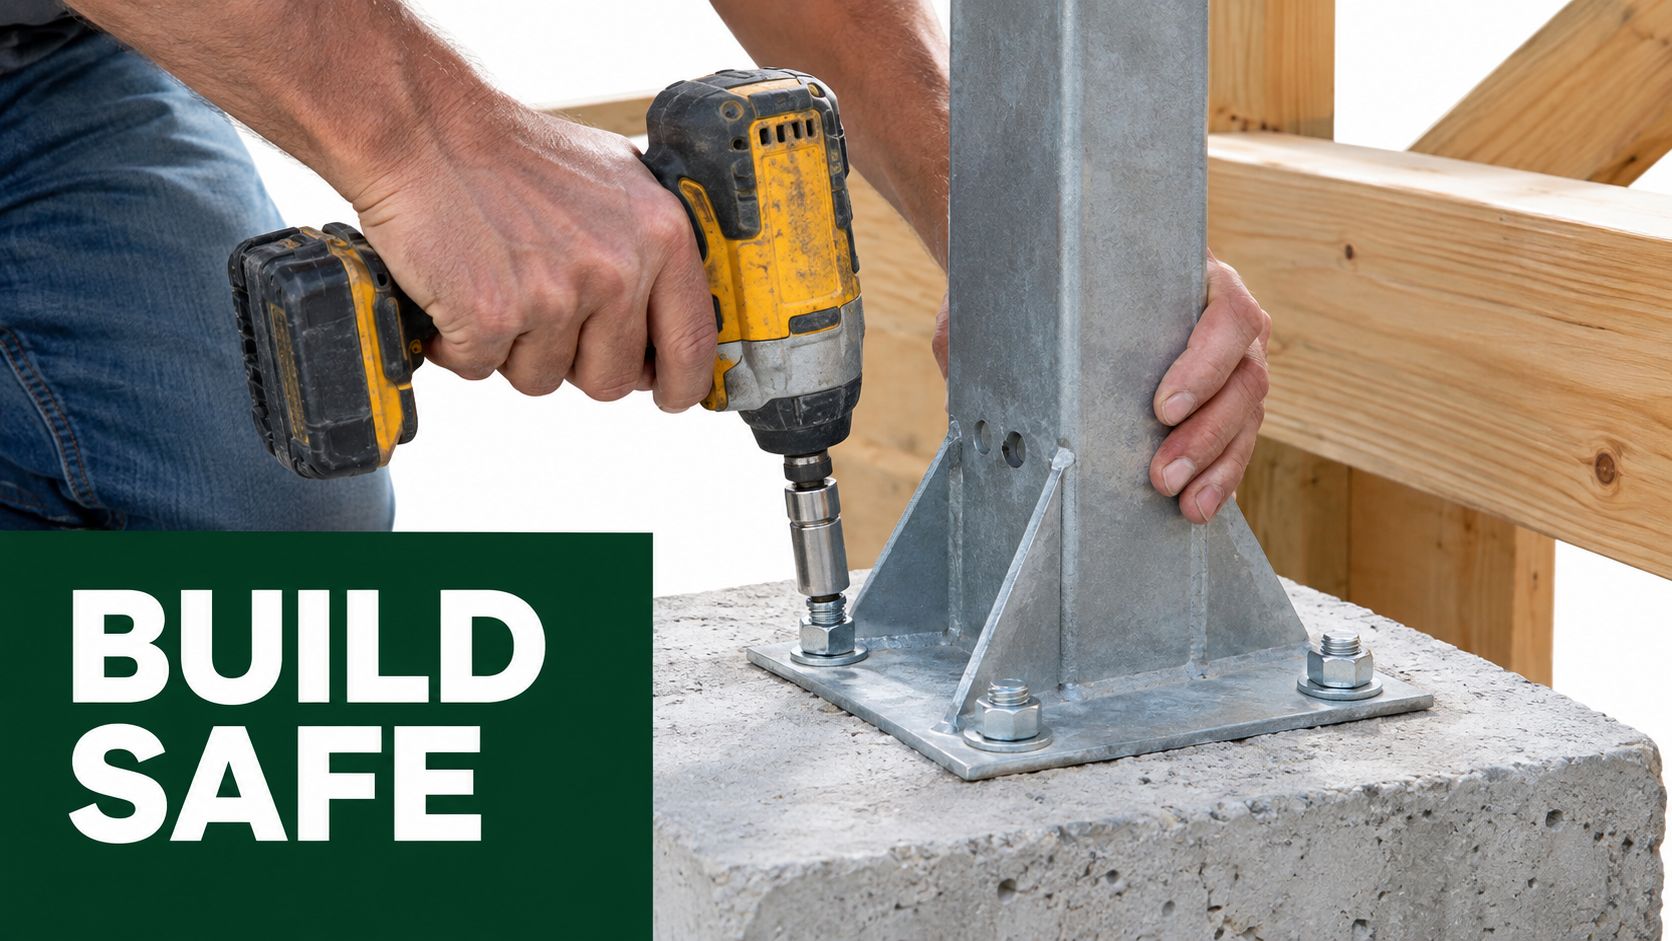
Attached decks deserve more discipline than freestanding platforms. Safety guidance from the International Code Council highlights that many collapses trace back to ledger failures, especially nail-only connections. Current IRC-based practice requires the ledger to be positively connected with 1/2-inch bolts or lag screws, not nails, and a 14-foot joist span may require lag screws spaced about 13 inches on-center when using nominal 2-inch lumber according to deck defect and ledger connection guidance.
The house connection also has to manage water. Flashing details, cladding type, rim condition, and fastener placement all matter. Get any of that wrong and you can pass water into the house while still thinking the ledger feels solid.
For many homeowners, this is the clear hire-versus-DIY threshold. A simple freestanding platform deck with easy access, straightforward spans, and no tricky stair geometry can be a realistic owner-build if the permit set is clear and you stay inside prescriptive limits. Once the job includes a ledger, tall stairs, multiple beam lines, or complex inspections, paying for experienced framing usually costs less than rework, failed inspections, and material waste. If budget is the sticking point, that is often where financing becomes part of the decision. It lets homeowners build the structure correctly instead of cutting back on footings, connectors, or framing depth. For examples of the kinds of deck projects that move beyond a basic DIY platform, review these finished deck framing and build examples.
Installing Decking Railings and Stairs With Pro Level Finishing
This is the part everyone pictures first, and it's also the stage where good framing either pays you back or exposes every shortcut. Clean decking lines, solid rails, and comfortable stairs don't happen by accident. They come from steady layout, consistent fastening, and not rushing the finish work.
Laying deck boards so the surface stays clean
Start from your control edge and keep checking your line as you go. Don't assume every board is perfectly straight. Some need persuasion with clamps or board tools before fastening. If you let slight drift build up over several runs, it shows badly by the time you reach the far edge.
Board spacing needs consistency more than speed. The goal is a surface that drains, moves with seasonal changes, and still looks intentional. End joints should land where they're properly supported, and cut ends should look planned, not improvised.
A few details separate average work from sharp work:
Stagger joints with purpose: Random can look careless if support underneath doesn't line up well.
Pre-plan feature borders: Picture-frame details can look great, but they require matching support and cleaner cut discipline.
Keep fastener lines straight: A snapped line helps more than eyeballing.
Watch board crowns and face quality: Put the better face where it counts visually.
The finish work starts underneath. If the joists wander, the decking tells on you.
Railings need more than a good appearance
A railing that feels loose in the hand will never inspire confidence, no matter how nice the balusters look. The weak point is often the post attachment. Newel posts need to tie into the framing in a way that resists movement, not just sit on the surface with decorative hardware trying to do structural work.
Before installing rails, check these items:
Post placement: Make sure it works with stair openings and doesn't crowd seating or traffic paths.
Backing and blocking: Surface-mounted components need proper structure below.
Sight lines: A rail layout should feel balanced from the yard and from inside the house.
Grip and use: The top rail should land where it feels natural and secure in daily use.
If you're using a mixed-material rail system, read the manufacturer's instructions before drilling anything. The sequence matters. Some systems look simple until one cut is off and the whole bay has to be redone.
Stairs are where sloppiness shows fastest
Nothing reveals inexperience like stairs with uneven rise or awkward run. People feel stair problems immediately, even if they can't explain what's wrong. The stringer layout has to be accurate, and the landing area has to support safe use in all weather.
Good stair work comes down to repetition and checks:
Lay out stringers carefully with the same reference each time.
Dry-fit before final fastening so the top and bottom transitions feel right.
Support the landing well so the stairs don't settle and change over time.
Keep tread installation consistent so the finished look stays clean.
I also like to think ahead during stair framing. If lighting, trim, or skirting might be added later, leave blocking or attachment points now while the structure is open. That saves frustration later and avoids drilling into finished work just to add something that could have been planned from the start.
The last passes on a deck matter. Trim proud edges, recheck for proud fasteners, sight the rail for consistency, and walk the stairs more than once. A deck can be structurally sound and still feel amateur if the finishing details aren't tight.
Finishing Costs Maintenance and When to Call 1st Choice Home Repairs
The deck is built, the grill is in place, and the first hard rain shows whether the job was really finished. Water hangs at the house, debris packs into corners, and the budget that looked fine on paper starts slipping because the last 10 percent of decisions were never priced clearly. That is where a deck either settles into low-hassle use or starts creating callbacks.
Finish choices and where budgets usually drift
Finish work needs to match the material, the exposure, and how much upkeep you will do. Pressure-treated wood often needs time to dry before stain or sealer goes on. Apply finish too early and it can peel or wear unevenly. Composite cuts down on surface upkeep, but it does not excuse skipped inspections underneath. Joists still stay wet if drainage is poor. Rail posts still loosen if connections were weak. Stairs still move if the base gets soft.
Budget overruns usually come from details homeowners decide on after framing starts. Wider stairs cost more. Picture-frame borders take time. Fascia, skirting, post sleeves, hidden fasteners, low-voltage lighting prep, and drainage fixes all add labor and material. Site access matters too. A backyard that requires hand-carrying every board and bag of concrete will cost more than an open lot with clean access.
Permit fees and review timing can also shift the schedule, especially if you are trying to build in a narrow weather window or around family events. In St. Charles County, that timing affects real choices. It can determine whether you push ahead with a simple code-table layout or add design features that trigger more review, more coordination, and more labor.
Financing also changes the decision. Some homeowners scale the project down to stay in cash, then regret cutting the stair width, drainage work, or railing package they needed. Others are better served by building the right deck once and spreading out the cost, especially when the project includes repairs at the ledger, door threshold, or grade around the house.
A maintenance routine people actually follow
The maintenance plan has to be simple enough to survive real life.
Use a short routine you can repeat every season:
Clean out debris from board gaps, stair corners, and around posts where water tends to sit.
Check movement at rails, stairs, and visible connections.
Watch wet areas near downspouts, planters, hose bibs, and anywhere the deck meets the house.
Look over the surface for finish wear, splitting, popped fasteners, or boards that have started to crown or shift.
Inspect the underside if you can reach it, especially for trapped leaves, dark staining, and framing that stays damp.
The safety issue is simple. Decks rarely fail without warning. They usually show movement, rot, loose connections, or chronic moisture problems first. Homeowners get into trouble when they ignore those signs because the deck still looks decent from the yard.
If a railing moves, a stair settles, or water keeps standing near the house, fix it early.
When DIY should stop and a pro should take over
A ground-level platform in an open yard can be a fair DIY project if you can read span tables, build square, and stay patient. The threshold changes fast when the deck attaches to the house, rises higher off grade, includes multiple stair runs, or needs drainage correction to protect the framing and siding. That is where code tables, permit timing, and moisture management stop being paperwork and start driving the build.
Bring in a pro when:
The ledger connection is uncertain, or the wall behind it has siding, brick veneer, old flashing, or signs of past water entry.
Drainage is poor, and runoff may keep framing wet or push water back toward the foundation.
The layout goes beyond a basic rectangle, especially with landings, turns, or grade changes.
You plan to reuse existing framing, but do not know what is still sound.
The project has to stay on schedule for permit signoff, inspections, and material sequencing.
For homeowners who have crossed that line, deck and exterior repair services from 1st Choice Home Repairs are a practical option. A good proposal should spell out scope, connection details, material assumptions, drainage corrections, permit responsibility, and what happens if hidden damage shows up after demolition.
That level of clarity matters. It keeps a backyard project from turning into an unfinished structure, a stack of change orders, and a deck that still holds water where it should drain.
Comments