
Ceramic Tile Floor Repair: A Local Homeowner's Guide

You step onto the kitchen floor with a mug in one hand and feel it immediately. One tile shifts slightly under your foot, or a hairline crack catches your sock. It may look like a small defect, but ceramic tile rarely fails in isolation. The visible surface is only the top layer of a system that also includes grout, setting material, and the substrate beneath it.
That's why ceramic tile floor repair should begin with diagnosis, not a trip to the home center. In St. Charles County homes, older backer board, wood-framed floors, slab movement, plumbing leaks, and discontinued tile patterns can turn a quick patch into a repeat repair. The right question isn't, “How do I replace this tile?” It's, “Why did this tile fail here?”
Why a Single Crack Matters More Than It Looks
A homeowner usually notices the first problem by feel. The tile may sound different when tapped, the grout may crumble along one edge, or the crack may widen after a cold spell or a stretch of wet weather. In a St. Charles County kitchen, that one damaged square often sits above a plank subfloor, a concrete slab, or an older underlayment that has been carrying movement for years.
The crack itself may have come from a dropped pan. It may also be the first visible sign of subfloor deflection, moisture entering through an open joint, or a tile that lost contact with its setting material. A replacement tile can hide the symptom while leaving the cause untouched.
Practical rule: Remove the damaged tile only after you've checked whether nearby tiles move, sound hollow, or show matching cracks.
Ceramic tile surfaces are built for a long service life. A life-cycle study of ceramic tile surfaces reported a typical expectation of about 50 years, while also noting that grout erosion and contamination can shorten that period and lead to grout restoration or tile replacement. The same study found that tile becomes economically advantageous when its service life exceeds approximately 20 to 25 years, which helps explain why preserving a sound installation is often preferable to removing an entire floor. You can review the ceramic tile life-cycle study for its maintenance and replacement model.
What the first crack can reveal
A single crack running across the middle of a tile may indicate impact damage, especially if the surrounding tile remains firmly bonded. A crack that starts at a corner, follows a grout joint, or returns after replacement deserves more attention. It can reflect stress concentrated at an unsupported edge or movement below the tile.
Moisture creates a different set of warning signs. Open grout joints allow water to enter the assembly, where it can contribute to staining, efflorescence, and mold growth. A materials study reported that water absorption of about 5% was associated with an approximately 50% reduction in mortar bond strength, while absorption of 10% or more produced reductions of 75% or higher. The study also reported that moisture can reduce the flexibility of the adhesive mortar's polymer film by about 50%. Those findings are discussed in the materials research on moisture and tile bond deterioration.
That matters around dishwashers, sinks, refrigerator water lines, exterior doors, and bathrooms. A tile may crack because the bond beneath it has weakened, not because the ceramic itself was unusually fragile.
The local warning signs
Older St. Charles County homes can present several conditions that make an isolated patch unreliable:
Plank subfloors over basement joists can flex when framing or underlayment no longer provides uniform support.
Slab cracks near exterior walls can telegraph upward into tile and grout.
Busy kitchen traffic can expose weak bonds and fatigue grout at cabinet lines and transitions.
Legacy tile installations may use products or patterns that are difficult to match, making careless removal more noticeable.
Before buying a replacement, walk the surrounding area slowly. Press on adjacent tiles, tap them with a coin, and look for a repeating pattern. If the defect is isolated and the substrate feels stable, repair may be sensible. If the same line continues across several tiles, stop treating it as a one-tile problem.
Common Ceramic Tile Floor Problems and What They Really Mean
The surface gives you clues, but it doesn't provide a complete diagnosis. A good inspection connects each visible defect to a possible failure below it.
Read the symptom before choosing the fix
Hairline cracks deserve attention when they run through multiple tiles or reappear in the same path. A crack limited to one tile after a clear impact may be local damage. Cracks that align with a slab joint, cross a room, or recur after replacement can point to substrate movement or inadequate movement accommodation.
Chips at exposed edges often come from impact, but a repeating line of chipped corners suggests unsupported tile edges or lippage that concentrates stress. A small glaze chip over a dry, stable base may be a reasonable cosmetic repair. A deep chip with a crack extending into the body of the tile should be removed and inspected.
Hollow-sounding tiles don't always mean immediate failure, but a cluster of hollow areas raises concern about incomplete mortar contact or debonding. If the tile rocks underfoot, the issue has moved beyond sound. Movement can break grout, enlarge voids, and damage adjacent tiles.
Cracked or powdery grout may indicate ordinary wear in a busy kitchen, but it can also show that the tile assembly is moving. Grout that stays damp, darkens repeatedly, or crumbles near a plumbing fixture deserves a moisture check rather than a quick regrout.
Missing or darkened caulk at a tub, shower, wall, or cabinet transition is a water-management problem. Those joints change position as materials move, so rigid grout often cracks there. Failed flexible sealant gives water a path into the edge of the installation.
Lippage, the height difference between neighboring tiles, can result from uneven substrate preparation, tile warpage, or inconsistent mortar coverage. A mild visual difference may be tolerable. A sharp edge that catches a toe can indicate an installation problem that won't be corrected by replacing only the higher tile.
Tiles popping free are a stronger warning. When tiles lift, tent, or release from the floor, look for widespread movement, moisture, or missing movement provisions. Rebonding the loose piece without investigating the surrounding assembly usually produces a temporary result.
Visible Problem | What You See | Likely Underlying Cause |
|---|---|---|
Hairline crack | One fissure or a repeating crack line | Impact, substrate movement, slab cracking, or deflection |
Edge chip | Damage at corners or exposed edges | Impact, unsupported edges, or lippage |
Hollow tile | Echoing sound when tapped | Voids, incomplete mortar contact, or debonding |
Loose tile | Rocking, shifting, or movement underfoot | Bond failure, moisture, or substrate movement |
Powdery grout | Joints crumble or release dust | Moisture, movement, poor cure, or age-related fatigue |
Dark grout | Persistent staining or damp appearance | Water migration, contamination, or a leak |
Missing caulk | Open joint at a wall, tub, or shower | Failed flexible seal at a moving transition |
Tile popping free | Tile rises or releases from the floor | Widespread stress, movement, or bond failure |
Conditions common in local homes
A basement-supported wood floor may feel solid in one room and flexible in another. A slab-on-grade floor can look stable while a crack near an exterior wall continues to move. Neither condition can be solved reliably with a new tile alone.
The important distinction is between isolated impact damage and a pattern. One broken tile surrounded by firm, well-supported tiles is a repair candidate. Several hollow tiles, matching cracks, or failing grout across a traffic path suggest that the floor needs a broader assessment before materials are selected.
Diagnose Before You Buy a Single Tile
A homeowner in an older St. Charles County house may replace a cracked tile and find the same crack returning weeks later. The cause may be substrate movement, moisture below the floor, or a replacement that does not match the original tile's thickness. Ceramic tile floor repair starts with diagnosis, not a shopping list.
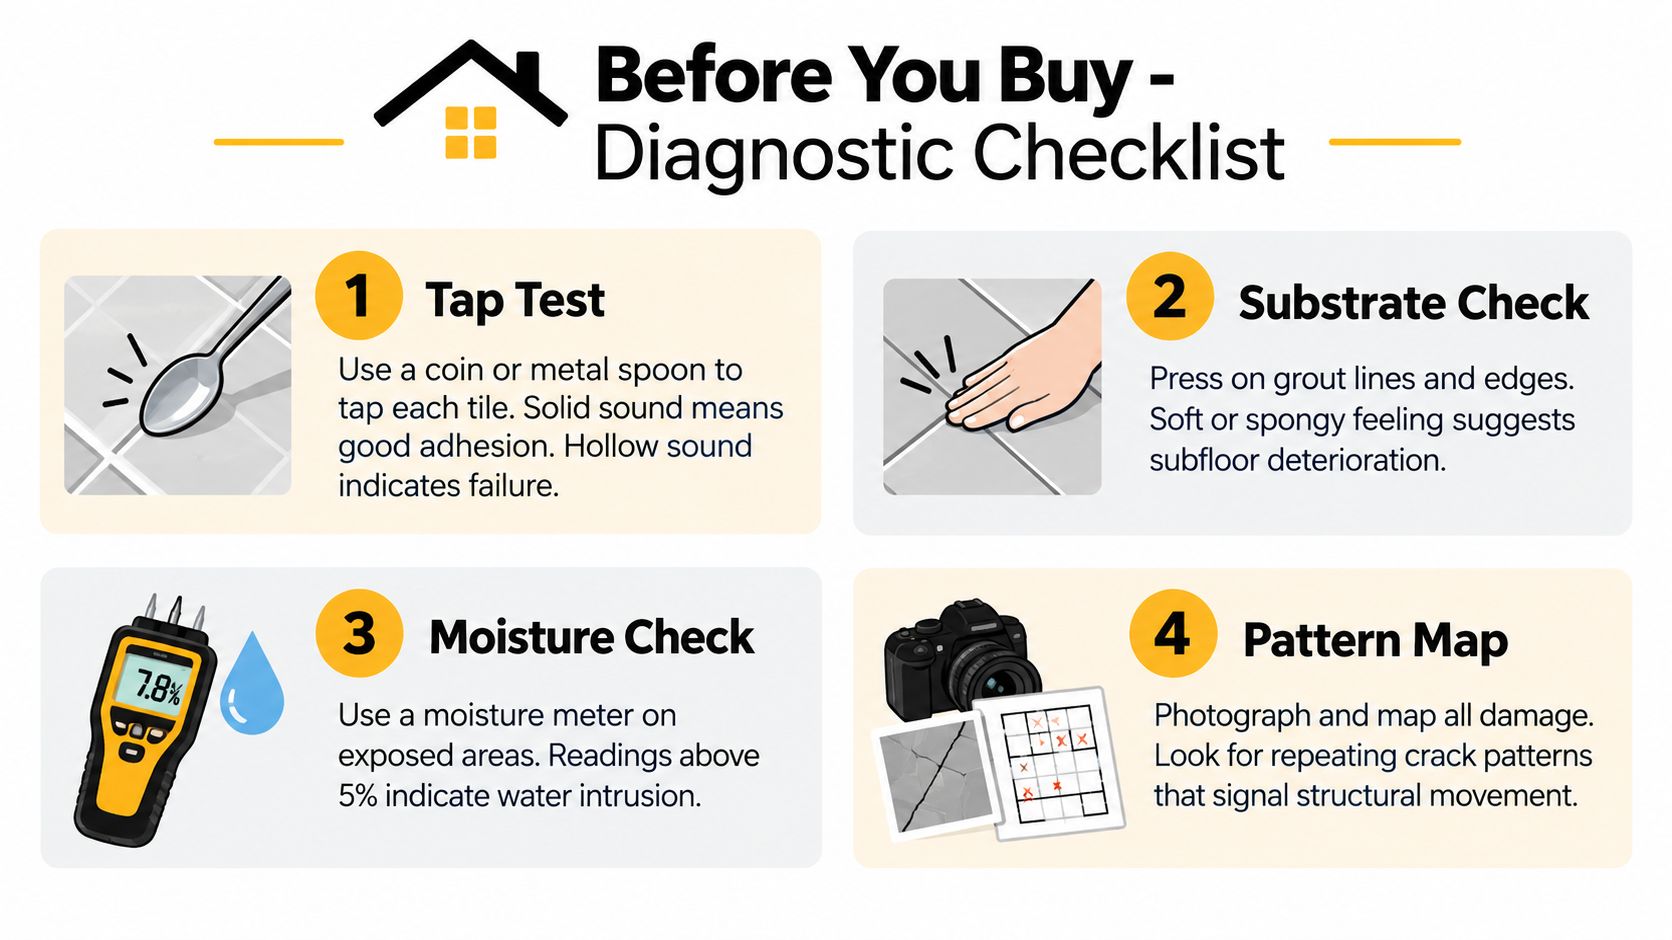
Follow a simple decision tree
Start with the tap test. Tap the damaged tile and several nearby tiles with a coin, screwdriver handle, or metal spoon. Compare the sounds rather than judging one tile in isolation. A hollow or different sound can point to a void or weak bond, though it does not confirm the cause. Mark suspicious areas with painter's tape and check whether they form a cluster or remain isolated.
Study the crack before removing anything. A crack confined to one tile often has a different cause from a line that crosses grout joints or continues through neighboring tiles. Look for the same pattern in another room, especially in older homes where floor sections may move differently. Photograph the area first. That record helps separate a one-time impact from recurring movement.
Press gently along grout joints and tile edges. Soft, crumbling, or spongy material means the joint has lost integrity and may be responding to movement or moisture. At tubs, showers, walls, and other wet transitions, inspect caulk for gaps, mildew, darkening, or separation. Remove failed caulk before resealing, then find out why the joint remains wet.
Look below the visible surface
Check for efflorescence, stains, musty odors, or dampness near plumbing fixtures and exterior walls. If the floor sits over a basement or crawlspace, inspect below it when access is safe. A small leak, condensation issue, or wet subfloor can defeat a repair from underneath.
A loose threshold or baseboard may offer a limited view of the installation edge. Remove trim only when it can be done without damage. The goal is to collect evidence, not create another repair.
Use these findings to choose the next step:
One damaged tile, stable surroundings, and no moisture signs: Find a close match, then confirm its thickness and setting requirements.
Several hollow or loose tiles: Pause and investigate bond coverage, substrate flatness, and movement before buying materials.
Recurring cracks, dampness, or stained substrate: Arrange moisture or structural evaluation rather than resetting a tile.
Unknown older materials or hazardous dust concerns: Stop demolition until the flooring system is assessed safely.
Tile installation guidance recommends checking exposed substrate for cracks, delamination, moisture, and movement before resetting a replacement. It also calls for a clean surface without grease, dust, sealers, adhesive residue, or other contaminants that interfere with bonding. The tile installation and repair guidance from Custom Building Products explains why preparation and mortar contact matter as much as finding a visually similar tile.
Step-by-Step Ceramic Tile Floor Repair the Right Way
A single-tile replacement can be a reasonable homeowner project when the surrounding floor is firm, dry, and well bonded. In older St. Charles County homes, though, the visible crack is often only the symptom. Seasonal movement, a slight dip in the underlayment, or a tile bed that never bonded properly can cause the replacement to fail. Treat the work as a diagnosis followed by a repair, not as a cosmetic patch.
Gather compatible materials
Set out the replacement tile, matching grout, compatible thin-set mortar, margin and notched trowels, rubber mallet, tile spacers, grout float, sponge, bucket, utility knife, grout saw or oscillating tool, vacuum, eye protection, and a straightedge. Keep a small container for debris so fragments do not scratch nearby tile or spread through the room.
Choose mortar for the actual substrate and tile. Follow the product instructions for water ratio, mixing time, open time, and cure requirements. Do not thin mortar with extra water after it starts stiffening. A convenient adhesive can still be unsuitable for the setting surface, tile size, or moisture conditions.
Older flooring deserves extra caution during demolition. If cutting or grinding may release suspicious dust, stop and arrange appropriate testing or licensed abatement before disturbing the material. A quick repair is not worth exposing the household or spreading contaminated debris.
Remove the tile without damaging neighbors
Remove all grout around the damaged tile first. This separates the work area and keeps chisel pressure from transferring into adjacent tiles. It also gives the replacement enough room to be positioned without scraping its edges against the surrounding installation.
Score the tile surface, then drill several relief holes toward the center, staying clear of the perimeter. Use a cold chisel or small pry tool to break pieces inward and lift them out one at a time. Keep the tool pointed toward the opening. Patience matters more than force here.
Vacuum the cavity, then scrape away old mortar, adhesive, and loose fragments until the base is firm. Remove ridges rather than trying to bury them under fresh mortar. A high spot can leave the new tile proud of its neighbors, while a lump can create a hollow area beneath it.
Inspect and flatten the opening
Examine the exposed base for cracking, delamination, dampness, darkened material, or movement under hand pressure. If the substrate is damaged or flexes, stop the tile repair and correct that condition first. In an older St. Charles County house, a replacement over a weak base usually becomes another cracked tile.
Use a compatible patching compound for depressions and ridges, then check the area with a straightedge. Common installation tolerances are approximately 1/4 inch over 10 feet for smaller tile and 1/8 inch over 10 feet for tile with an edge of 15 inches or longer, as described in the industry installation guidance on tile flatness and mortar coverage. A small repair still needs a reasonably flat setting surface because the tile edges cannot bridge a low spot reliably.
Set the replacement tile
Key mortar into the substrate with the flat side of the trowel. Comb fresh mortar in one direction with the notched side. Press the tile perpendicular to those ridges while sliding it slightly. This helps collapse the ridges and reduces voids below the tile.
Back-butter a larger tile when the mortar and tile manufacturers call for it. Set the spacers, then compare the replacement's face with neighboring tiles from several angles. Use the rubber mallet only for gentle adjustment. Brittle ceramic can crack from a sharp impact or from pressure concentrated at one corner.
Lift the tile once to check contact before the mortar begins to set. Dry interior floors should achieve at least 80% mortar contact, while wet areas and exterior applications require 95%, with support distributed across the tile rather than concentrated at corners. These benchmarks are part of standard manufacturer installation guidance.
Settle lippage before the mortar hardens. If the tile rocks, sits high, or shows a poorly supported area, remove it and correct the mortar bed. Grout can finish a joint, but it cannot stabilize a badly supported tile.
Finish the joints carefully
Allow the mortar to cure according to the manufacturer's instructions before grouting. Remove the spacers and clean the joint edges. Press grout firmly into the joints with a float, strike them consistently, and wipe the tile surface with a damp sponge before residue hardens.
Matching grout may take more judgment than matching tile. Existing joints often changed color through age, cleaning, sunlight, or household use. Test the new grout in an inconspicuous spot, especially beside older ceramic with a textured or porous surface. Clean haze promptly.
Seal the grout only if the product instructions allow it. Keep traffic off the repair until the mortar and grout reach their required cure. If the tile sounds hollow or feels loose afterward, remove it and reassess the base instead of packing more grout into the joints.
A visual demonstration can help with tool handling and removal technique:
Grout and Caulk Repairs That Hold Up Over Time
Grout and caulk aren't decorative leftovers. They control how water and movement interact with the edges of a tiled floor. A tile can be bonded correctly and still develop a larger problem if the joints are left open, packed with the wrong material, or sealed over contamination.
Remove failed grout with a grout saw or an oscillating tool fitted for joint work. Vacuum the debris and avoid cutting into the tile edges. Lightly dampen the joint if the product instructions call for it, then press fresh grout into the opening at an angle that fills the full depth. Strike the joint consistently and wipe haze before it cures.
Sanded and unsanded grout have different uses, so follow the product guidance for the joint width and tile surface. Epoxy grout can make sense where staining and chemical resistance matter, but it demands careful mixing, placement, and cleanup. It isn't a shortcut for a moving substrate.
Grout can fill a joint, but it can't replace a movement joint or repair a wet subfloor.
At tubs, showers, walls, and changing transitions, use a compatible flexible silicone caulk rather than rigid grout. Remove every loose strip, clean and dry the joint, and apply the new bead without trapping debris. Separation, mildew, and recurring darkening indicate that the joint has already lost its protective function.
Joint Location | Recommended Material | Why It Matters |
|---|---|---|
Tile to wall | Flexible silicone caulk | Accommodates movement at the perimeter |
Tile to tub or shower | Wet-area silicone caulk | Limits water entry at a changing transition |
Tile to tile in a standard field | Compatible grout | Fills the joint between stable tile surfaces |
Movement or control joint | Manufacturer-approved flexible sealant | Allows the assembly to move without transferring stress |
Cabinet or fixed trim transition | Material suited to the joint and exposure | Prevents an open edge from collecting moisture and debris |
On slab-on-grade floors common in the area, water can travel through a failed edge joint and remain hidden beneath tile. Regrouting without correcting the source may improve the appearance while leaving the substrate exposed.
For property owners who need help with tile, trim, or related repairs, the home repair services available from a local handyman team can be evaluated alongside the condition of the floor. The important point is to request a repair that addresses the joint and the cause, not just a fresh bead of material.
Repair or Replace How to Decide Without Wasting Money
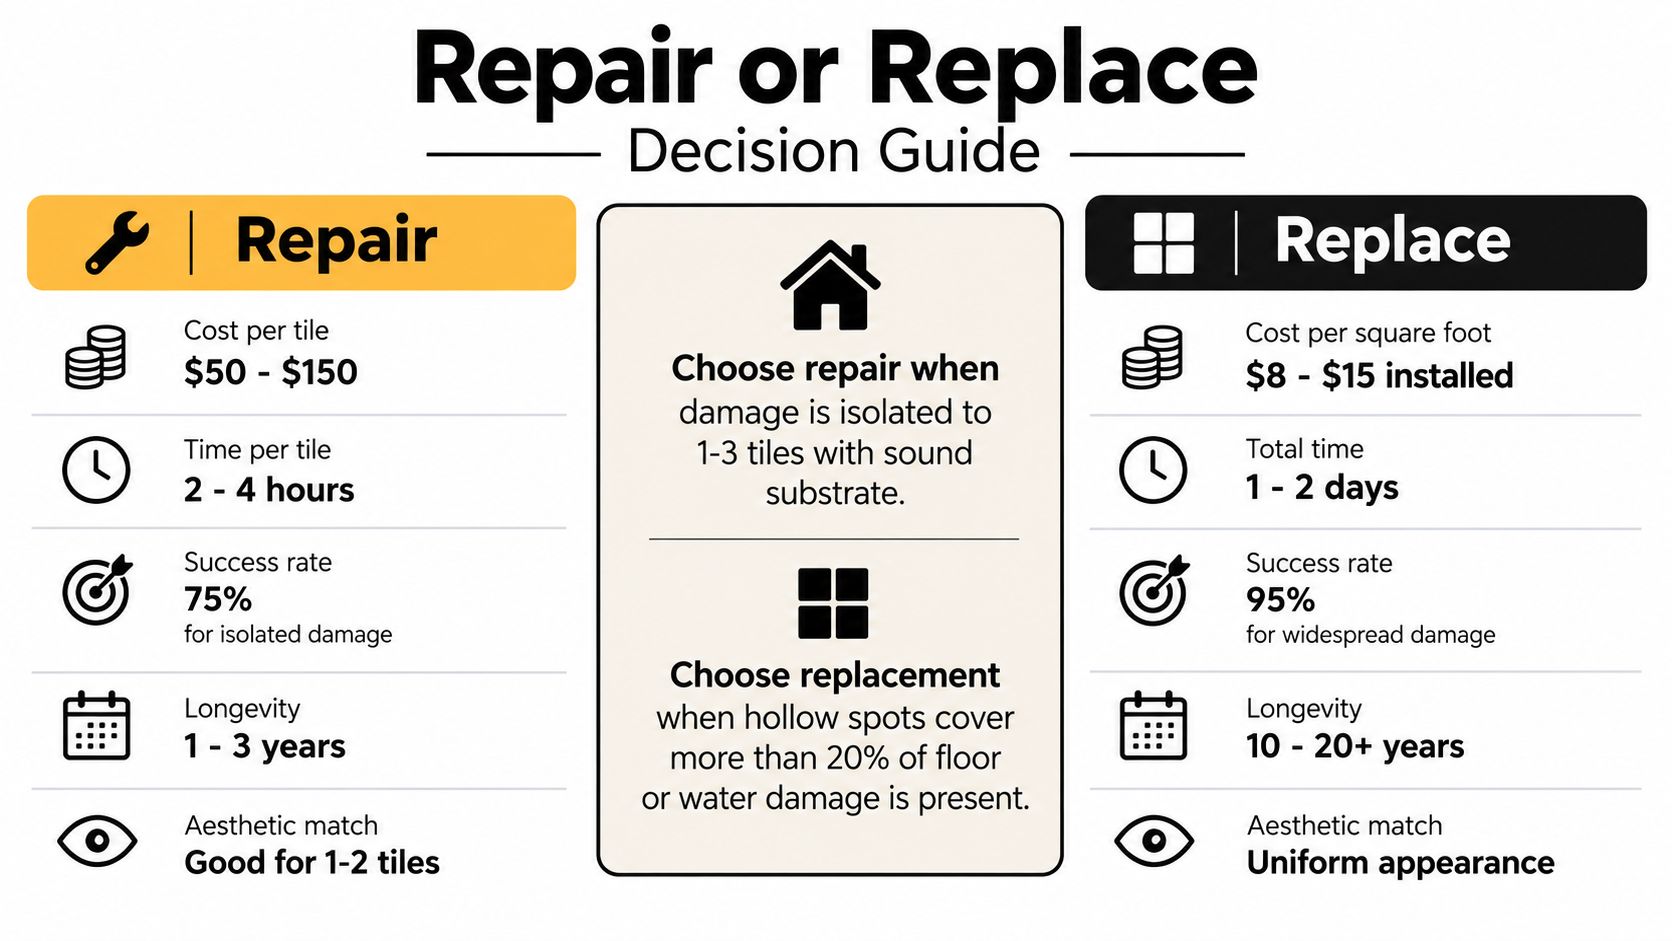
Repair makes sense when the damage is contained and the surrounding installation still performs well. Replacement makes more sense when the floor has a repeating failure pattern, the substrate is compromised, or the existing tile is already difficult to maintain.
A one-tile repair usually creates less dust, less disruption, and less disposal than removing an entire floor. It also preserves a serviceable installation and may be the only practical way to retain an older pattern that is no longer sold. The trade-off is appearance. Even a well-matched replacement can differ because the original tile has aged, faded, or collected wear.
Full replacement gives the installer a chance to correct flatness, movement accommodation, mortar coverage, and damaged underlayment across the room. It creates more demolition and downtime, and it may expose additional problems around cabinets, transitions, appliances, or plumbing. The larger scope is justified when the current floor has become a system failure rather than a single damaged surface.
The local factors that change the answer
Older homes may have original tile, older backer materials, or patterns that are no longer available. If the replacement tile can't be matched, a single repair may stand out more than the original crack. Keeping spare pieces from the installation, if any exist, can make targeted repairs much more practical.
Look beyond the damaged room. Recurring cracks in multiple rooms, clusters of hollow tiles, or movement near a foundation wall point toward a broader cause. Water damage beneath a kitchen, bathroom, or laundry area also changes the decision because the tile is no longer the only material at risk.
A useful decision rule is simple:
Choose localized repair when one or a few tiles are damaged, nearby tiles are solid, the substrate is dry, and no repeating crack pattern is present.
Choose broader repair or replacement when hollow areas are widespread, tiles keep failing, the floor moves, moisture is present, or the existing tile can't be matched.
Bring in a professional when the substrate, framing, foundation, or older building materials may be involved.
A long-service ceramic floor can be environmentally and financially preferable to replaceable finishes when it remains sound. Industry environmental documentation also notes that ceramic tile has traditionally been replaced rather than repaired or refurbished when it fails. The ceramic tile environmental product documentation supports a more balanced decision. Preserve the floor when targeted repair will last, but don't use sustainability as a reason to leave moisture or movement unresolved.
Examples of completed home repair work can help you judge whether a contractor has handled similar preparation and finish requirements. Review the tile and home repair project portfolio, then ask specifically how the contractor diagnoses hollow areas and substrate failure.
When to Call a Pro and How 1st Choice Home Repairs Can Help
DIY ceramic tile floor repair is reasonable when the failure is isolated, the floor is dry and stable, and the homeowner can work carefully without disturbing adjacent tiles. It's a poor fit when the floor tells a larger story.
Call for professional help when you find widespread cracking, several hollow or loose tiles, water staining, a failed underlayment, noticeable floor flex, or a crack that returns after repair. A contractor should also be involved when demolition may disturb hazardous older materials or when framing movement and foundation conditions need evaluation.
Questions homeowners commonly ask
Can I fill a cracked tile instead of replacing it?A surface repair can improve the appearance of a superficial chip when the tile is firmly bonded and the base is dry. It won't correct movement, moisture, or a crack that extends through the tile body.
Should I repair a loose tile without removing it?Some injection-style repair methods may be appropriate for limited hollow areas, but they aren't a substitute for substrate inspection. Don't use a surface injection approach where standing water, active leaks, widespread debonding, or moving substrate is present.
Why did my replacement tile crack again?The original cause may still be active. Recurring failure commonly points to movement, inadequate support, moisture, poor flatness, or missing movement accommodation rather than bad luck with the replacement tile.
Can a handyman match discontinued tile?A careful repairer can compare size, thickness, surface texture, color, and edge profile, but an exact match isn't always possible. A planned transition or a small coordinated replacement area may look better than forcing one visibly different tile into the middle of an older floor.
Local crews serving St. Charles County communities such as Wentzville, Lake Saint Louis, Cottleville, O'Fallon, Dardenne Prairie, and St. Peters can evaluate whether the job is a single-tile repair, a grout and caulk correction, or a larger substrate project. For broader home repair support, see the local handyman service information. Ask about scheduling, financing options, the scope of preparation, and the workmanship guarantee before work begins.
If your floor has one cracked tile, photograph it, tap the surrounding area, and check for moisture before buying materials. For a professional assessment, matching tile help, substrate repair, or a larger ceramic floor replacement, visit 1st Choice Home Repairs and request a clear recommendation for the condition beneath your floor.
Comments